En esta temporada navideña, Google una vez más levantó el espíritu navideño de quienes visitaron su página de inicio, con su logotipo animado o garabato, como lo llaman. Ahora, con las vacaciones a nuestras espaldas, podemos aprovechar las calorías de esa lujosa cena y tratar de ponernos en forma para la semana siguiente. Así que intentemos recrear el logo animado de Google con la ayuda de jQuery y un poco de CSS.
HTML
Primero, el marcado. Como la mayor parte del HTML es generado por jQuery, solo necesitamos especificar un titular div. Así es como se ve nuestra página:
index.html
<!DOCTYPE html>

<html>
<head>
<meta http-equiv="Content-Type" content="text/html; charset=utf-8" />
<title>Making Google's Christmas Doodle with jQuery | Tutorialzine Demo</title>

<link rel="stylesheet" type="text/css" href="css/styles.css" />

</head>
<body>

<div id="page"></div>

<script src="http://ajax.googleapis.com/ajax/libs/jquery/1.4.4/jquery.min.js"></script>
<script src="js/script.js"></script>

</body>
</html>
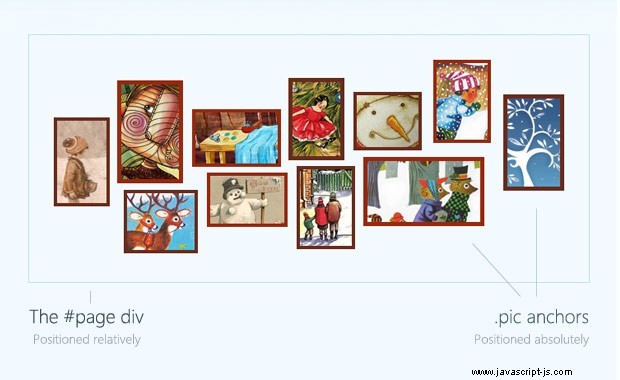
Stylehseets van en la parte superior, archivos de secuencias de comandos en la parte inferior. El div #page va a contener el marcado generado del garabato. Puede ver un ejemplo generado en el siguiente fragmento:
<a href="#" class="pic" style="top: 100px; left: 30px; width: 60px; height: 100px;
margin-top: 0px; margin-left: 0px; z-index: 0;">
    <img style="display:block;left:-10px;top:-30px;" src="img/1.jpg" />
</a>
<!-- More items -->
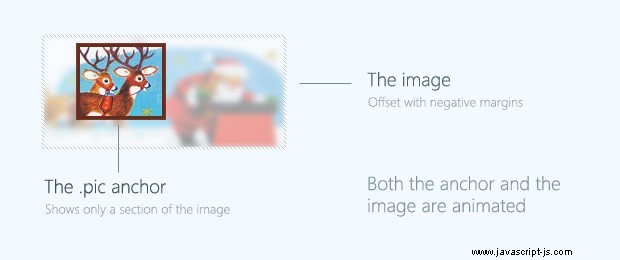
Las propiedades top, left, width y height se pasan a jQuery en el evento document.ready. Se incluyen como atributos de estilo para el ancla de imagen generada. El elemento a también contiene la imagen, que está parcialmente oculta con oveflow:hidden . Cuando movemos el cursor sobre el .pic, se expande y revela el resto de la imagen. Esto suena simple, pero este enfoque tiene una serie de advertencias que no son obvias al principio:
- No podemos vincular eventos de la forma habitual. Cuando una imagen se expande, cubrirá las imágenes vecinas y las hará inalcanzables, lo que sería un gran inconveniente. Si lo piensas en la escala de Google, esto significaría mucha gente infeliz;
- La imagen debe aparecer fija en un lugar durante la duración de la animación. Esto significa que tenemos que actualizar su desplazamiento (usando las propiedades de margen) en cada paso de la animación del ancla. Esto requeriría animar dos elementos distintos al mismo tiempo con una sincronización perfecta, de lo contrario, las imágenes se moverían.
CSS
El código CSS es mínimo, ya que solo necesitamos diseñar la #página div y el .pic anclas.
css/estilos.css
#page{
    width:680px;
    height:300px;
    margin:60px auto 80px;
    position:relative;
}

.pic{
    position:absolute;
    overflow:hidden;
    border:4px solid #99280e;
    text-decoration:none;
    z-index:0;
}

.pic img{
    position:absolute;
    border:none;
}

.pic:nth-child(2n+1){
    border-color:#6A2B1C;
}

.pic:nth-child(3n+2){
    border-width:5px;
}
Estoy usando el nth-child Selector de CSS3 para apuntar a elementos específicos y aplicar bordes más oscuros y gruesos. Como esto es principalmente para fines de presentación, la secuencia de comandos aún funcionaría correctamente en navegadores más antiguos sin compatibilidad con CSS3.
jQuery
Para que el código esté mejor organizado (y más corto), crearemos una clase de JavaScript para las imágenes en expansión y crearemos un objeto de esta clase para cada una, pasando el ancho, alto, fuente y otras propiedades como parámetros.
Comencemos con la definición de clase:
js/script.js - Parte 1
  function pic(options){

        // All the properties of the options object
        // are copied to the current pic:

        $.extend(this,options);

        // Creating the markup of the pic,
        // and storing it in the elem property:

        this.elem = $('<a>',{
            className: 'pic',
            href: this.href,
            css : {
                top : this.top,
                left : this.left,
                width: this.width,
                height: this.height
            }
        });

        var borderWidth = 5;

        // The bottom and right properties are not passed
        // as arguments, so we need to calculate them.

        this.bottom = this.top+this.height+2*borderWidth;
        this.right = this.left+this.width+2*borderWidth;

        this.image = $('<img>',{
            css:{
                left : -this.img.offsetLeft,
                top : -this.img.offsetTop
            }
        });

        var self = this;

        // Appending the image to the body so we can get
        // its dimensions. After we do this, we remove it
        // and append it to the markup stored in this.elem:

        this.image.hide().appendTo('body').load(function(){

            self.img.width = self.image.width();
            self.img.height = self.image.height();
            self.elem.append(self.image.show());

        }).attr('src',this.img.src);

    }
La función pic de arriba es el constructor de nuestra clase. Como verá en unos momentos, vamos a crear un nuevo objeto de esta clase para cada imagen expandible en la página. Cuando se le llama, crea el marcado que vio en el primer paso y lo almacena en this.elem propiedad como un objeto jQuery. Esto significa que podemos usar la propiedad elem como un objeto jQuery normal, junto con todos los métodos que nos brinda la biblioteca.
js/script.js - Parte 2
// The prototype holds the class methods,
    // that are common for all objects.

    pic.prototype = {
        open    : function(){
            if(this.opened){
                return false;
            }

            this.opened = true;

            // Firing our own expand method with a percentage of 100:
            this.expand(100);
        },
        close   : function(){
            if(!this.opened && !this.focused){
                return false;
            }

            this.opened = this.focused = false;
            this.expand(0);
        },
        focus   : function(){
            if(this.focused || this.opened){
                return false;
            }

            this.focused = true;

            //Expanding to 30%:
            this.expand(30);
        },

        near    : function(x,y){
            // Checking whether the passed x and y coordinates are near the current image:
            return (x > this.left-15 && x < this.right+15 && y > this.top-15 && y < this.bottom+15);
        },

        over    : function(x,y){
            // The same, but returning true only when directly above the image:
            return (x > this.left && x < this.right && y > this.top && y < this.bottom);
        },

        expand : function(animPercent){
            if(!this.animateObj){
                this.animateObj = {count:0};
            }

            // We use jQuery's animate method to
            // change the count property of the object:

            $(this.animateObj).stop().animate({
                count:animPercent
            },{
                duration:150,

                // The step funciton is executed on every animation frame.
                // With jQuery's proxy we pass the "this" of the function:
                step:$.proxy(this.stepAnimation,this)
            });
        },

        stepAnimation : function(p,fx){

            // P holds the current value of the count property,
            // between 0 and 100. Below we are turning it into percentage.

            p = p/100;

            // Changing the size and position of the image holder:

            this.elem.css({
                width : (this.img.width - this.width)*p + this.width ,
                height : (this.img.height - this.height)*p + this.height,
                marginTop : -this.img.offsetTop*p,
                marginLeft: -this.img.offsetLeft*p,
                zIndex: 100*p
            });

            // Moving the image so it appears as if fixed:

            this.image.css({
                marginLeft : p*this.img.offsetLeft,
                marginTop : p*this.img.offsetTop
            });
        }
    };
La propiedad prototipo contiene los métodos comunes que utilizan todos los objetos pic. abrir , cerrar y enfoque son envoltorios alrededor de expand método, también definido en el prototipo. Este método toma un porcentaje como su único parámetro y expande la imagen al tamaño especificado (el 100 por ciento corresponde al tamaño de la imagen mostrada por completo).
Eche un vistazo más de cerca a animate de jQuery en la línea 52. En lugar de llamarlo en un elemento DOM, lo estamos usando para incrementar el recuento propiedad de un objeto simple de JavaScript, mientras ejecutamos la animación nosotros mismos en el paso función más abajo. De esta manera, dejamos que jQuery maneje el tiempo, la aceleración, la cola y la detención de la animación, y solo nos diga cuándo actualizar las propiedades CSS de las imágenes. Esto resuelve el problema de animar varios elementos a la vez.
Como se mencionó al principio, no podemos vincular eventos a las imágenes expandibles. Para esto, tenemos dos métodos más interesantes - near y sobre . Estos toman las coordenadas x/y del puntero del mouse y devuelven una expresión booleana que indica si el mouse está cerca/sobre la imagen actual. Verá cómo se usa esto a continuación.
js/script.js - Parte 3
$(document).ready(function(){

        var page    = $('#page');

        // Creating the expanding images:

        var picArr = [
            new pic({
                top : 100, left : 30, width : 60,height : 100, href:'#',
                img : { src : 'img/1.jpg', offsetTop : 50, offsetLeft: 10}
            }),
            new pic({
                top : 55, left : 107, width : 70,height : 115, href:'#',
                img : { src : 'img/2.jpg', offsetTop : 30, offsetLeft: 46}
            }),

            /* More pics here */

        ];

        // Appending the images to the #page div:

        $.each(picArr,function(){
            page.append(this.elem);
        });

        // Setting up an event listener for the window.load event.
        // window.load is executed after all the images have been loaded.

        $(window).load(function(){

            page.mousemove(function(e){

                var left = (e.pageX - page.offset().left),
                    top = (e.pageY - page.offset().top),
                    pic = null;

                // On each mouse movement, loop through the pics
                // and check whether the cursor is above any of them.

                for(var i = 0;i < picArr.length;i++){
                    pic = picArr[i];

                    if(pic.near(left,top)){

                        if(pic.over(left,top)){
                            pic.open();
                        }
                        else pic.focus();
                    }
                    else pic.close();
                }

            }).mouseleave(function(){

                // When the mose leaves the #page div,
                // foce a close on all the images.

                for(var i = 0;i < picArr.length;i++){
                    picArr[i].close();
                }

            });
        });
    });
En el código de arriba estamos llenando el picArr matriz con objetos pic, después de lo cual los agregamos a la #página división Más tarde, en la window.load evento, vinculamos un oyente para el evento mousemove y verificamos si la posición actual del mouse está sobre alguna de las imágenes. Si está a menos de 15 píxeles de una imagen, la enfocamos, y si está directamente encima, ejecutamos el método abierto que muestra la imagen completa.
¡Nuestro logotipo navideño similar a Google está completo!
Para terminar
Puede usar este script en encabezados dinámicos, demostraciones de productos, recorridos o presentaciones de diapositivas. Al pasar diferentes parámetros al crear los objetos pic en script.js, podrá personalizar casi todos los aspectos del script. Como detecta los tamaños de las imágenes automáticamente, puedes cambiarlos fácilmente sin problemas.
Eso es básicamente todo. Ahora que estamos al día nuevamente, todos podemos tener una semana productiva antes de descarrilarnos con la próxima ronda de vacaciones a la vuelta de la esquina.