Introducción
Todos hemos visto los videos (y algunos incluso obtuvimos acceso a una vista previa para desarrolladores) del último producto de Google:Wave. Aunque no es "innovador" ni "revolucionario" como habíamos imaginado (me pregunto por qué me viene a la mente "sobrevalorado"), aún presenta una gran interfaz de usuario que seguramente inspirará al menos a algunos desarrolladores a implementar algo de ella en sus funciona.
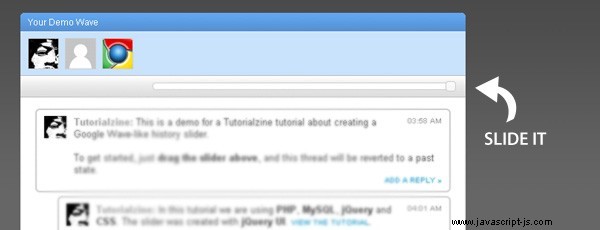
Yo, siendo una de esas personas inspiradas, les mostraré cómo crear un control deslizante de historial similar a Google Wave. Usándolo, permitiremos que nuestros visitantes avancen y retrocedan en el tiempo para ver los cambios que tienen lugar en un hilo de comentarios.
Así que eche un vistazo a la demostración (tal vez incluso manténgala abierta en una pestaña separada), descargue los archivos de ejemplo y siga leyendo.
Paso 1 - XHTML
Las tecnologías que estamos utilizando incluyen PHP como back-end, MySQL como almacenamiento de datos, jQuery ,
Primero echemos un vistazo a la sección del cuerpo de demo.php
demo.php
<div id="main">
<p id="orig">View the <a href="https://tutorialzine.com/2009/10/google-wave-history-slider-jquery/" target="_blank">original tutorial »</a></p>
<h1>Google Wave-like</h1>
<h2>History Slider</h2>
<div id="wave">
<div id="topBar">Your Demo Wave</div>
<div id="subBar">
<img src="img/tutorialzine.png" alt="Tutorialzine" /><img src="img/demo.png" alt="Demo" /><img src="img/curious.png" alt="Curious" />
</div>
<div id="sliderContainer">
<div id="slider"></div>
<div class="clear"></div>
</div>
<div id="commentArea">
<?php
foreach($comments as $c)
{
showComment($c);
// Showing each comment
}
?>
</div>
<input type="button" class="waveButtonMain" value="Add a comment" onclick="addComment()" />
<div id="bottomBar">
</div>
</div>
</div> Este es prácticamente todo el diseño que estamos usando. La razón principal por la que el código es tan corto es que estamos usando CSS para diseñarlo y que la salida de los comentarios es manejada por una función PHP especial, las cuales se explicarán en un minuto.
Paso 2:CSS
Lo bueno de jQuery es que, gracias al CDN de Google, puedes incluirlo directamente en tu sitio, sin tener que preocuparte por descargarlo y almacenarlo en tu servidor. Esto también ayuda al tiempo de carga de su página.
Lo mismo ocurre con jQuery UI, que contiene nuestro control deslizante. No solo eso, sino que la CDN también contiene el estilo y las imágenes necesarias para mostrarlo correctamente.
Sin embargo, todavía tenemos que incluir nuestros propios estilos personalizados. En los archivos de ejemplo puedes encontrarlos en demo.css . Aquí solo se muestran las partes más interesantes:
demostración.css
#orig{
    /* The link that float to the right of the title */
    float:right;
    font-family:"MyRiad Pro",Arial;
    font-size:10px;
    letter-spacing:1px;
    text-transform:uppercase;
    padding-top:10px;
}

.clear{
    /* Clearfix, needed by IE6 */
    clear:both;
}

#main{
    /* The main container */
    width:600px;
    margin:30px auto;
}

#wave{
    /* CSS rounded corners */
    -moz-border-radius:6px;
    -khtml-border-radius: 6px;
    -webkit-border-radius: 6px;
    border-radius:6px;

    background:white;
    width:100%;
    overflow:hidden;
}

#topBar{
    background:url(img/bg.jpg) repeat-x;
    font-size:12px;
    color:white;

    height:20px;
    overflow:hidden;
    padding:5px 0 0 10px;

    border-bottom:1px solid #e4f1ff;
    -moz-border-radius:6px 6px 0 0;
    /* A Firefox fix, for once */
}

#bottomBar{
    height:40px;
    background-color:#c9e2fc;
    -moz-border-radius:0 0 6px 6px;
    border-top:1px solid #CCCCCC;
}

#subBar{
    background-color:#c9e2fc;
    padding-left:10px;
}

#subBar img{
    /* The avatars at the top of the page */
    margin:8px 8px 8px 0;
    border:1px solid #cccccc;
}

.waveButton,.waveButtonMain{
    /* The submit buttons */
    background:url(img/button_bg.jpg) repeat-x 50% 50%;
    border:1px solid #DDDDDD;
    padding:4px;

    cursor:pointer;
}

.waveButtonMain{
    display:block;
    margin:10px 20px;
}

.textArea{
    padding:4px;
    font-family:Arial,Helvetica,Sans-serif;
    font-size:12px;
    color:#666666;
    border:1px solid #66aff9;
    margin-bottom:10px;
}

.replyLink{
    float:right;
}

#commentArea{
    padding:10px;
    color:#444444;
}

.commentText{
    margin-left:40px;
}

.waveComment .waveComment{
    padding-left:30px;
}

.waveComment .waveComment .replyLink{
    /* Hiding the reply link on the comment replies -
    only 2 levels of ancestry are allowed */

    display:none;
}

.waveTime{
    color:#999999;
    float:right;
    font-size:10px;
}

#slider{
    width:400px;
    font-size:10px;
    float:right;
    margin-right:10px;
}

#sliderContainer{
    background:url(img/dark_bg.jpg) repeat-x #f5f5f5 50% 50%;
    padding:9px 10px;
    border:1px solid #bbbbbb;
    border-left:0;
    border-right:0;

    height:10px;
    padding:9px 10px;
}

div.ui-widget-content{
    /* Styling the slider */
    background:#FFFFFF;
    border:1px solid #CCCCCC;
}

.comment{
    margin:5px 10px;
    padding:8px 10px;
    border:2px solid #cccccc;

    /* Rounding the comment */
    -moz-border-radius:6px;
    -khtml-border-radius: 6px;
    -webkit-border-radius: 6px;
    border-radius:6px;

    overflow:hidden;
}

span.name{
    font-weight:bold;
    color:#999999;
}

.commentAvatar{
    width:30px;
    height:30px;
    float:left;
    margin-right:10px;
} 
Paso 3 - PHP
Hay cuatro archivos PHP principales que manejan el back-end:
- demo.php - genera los comentarios;
- ajax/saveComment.php - agrega nuevos comentarios, es alcanzado por solicitudes AJAX;
- funciones.php - contiene algunas funciones utilizadas por demo.php;
- conectar.php - maneja la conexión DB.
Miraremos solo los primeros tres archivos aquí.
demo.php
define("INCLUDE_CHECK",1);
require 'connect.php';
require 'functions.php';
// Including the files for the DB connection and our custom functions
// Removing comments that are older than an hour.
mysql_query("DELETE FROM wave_comments WHERE id>5 AND dt<SUBTIME(NOW(),'0 1:0:0')");
$comments_result = mysql_query("SELECT * FROM wave_comments ORDER BY id ASC");
// Selecting all the comments ordered by id in ascending order
$comments=array();
$js_history='';
while($row=mysql_fetch_assoc($comments_result))
{
if($row['parent']==0)
// If the comment is not a reply to a previous comment, put it into $comments directly
$comments[$row['id']] = $row;
else
{
if(!$comments[$row['parent']]) continue;
$comments[$row['parent']]['replies'][] = $row;
// If it is a reply, put it in the 'replies' property of its parent
}
$js_history.='addHistory({id:"'.$row['id'].'"});'.PHP_EOL;
// Adds JS history for each comment
}
$js_history='<script type="text/javascript">
'.$js_history.'
</script>';
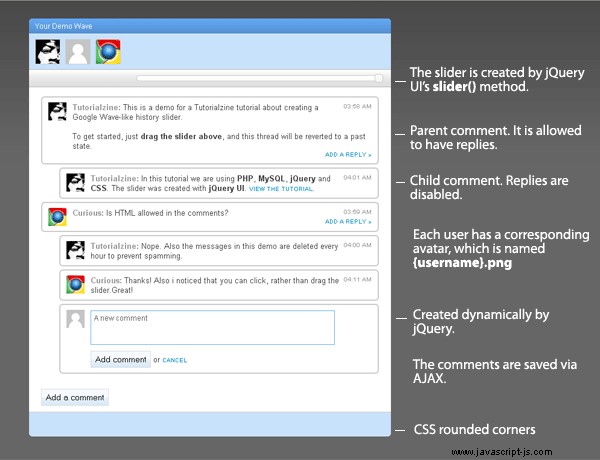
// This is later put into the head and executed on page load Los comentarios son padres etéreos (se agregan directamente al hilo) o hijos (se agregan como respuesta a un padre). Solo se permiten dos niveles de ascendencia (lo que significa que las respuestas están deshabilitadas para los niños).
Los comentarios luego son generados por el showComment función (puedes verlo en el paso XHTML anterior).
ajax / guardarComentario.php
define("INCLUDE_CHECK",1);
require'../connect.php';

if(empty($_POST['comment'])) die("0");
// If there isn't a comment text, exit

$comment = mysql_real_escape_string(nl2br(strip_tags($_POST['comment'])));
$user='Demo';
// This would be a nice place to start customizing - the default user
// You can integrate it to any site and show a different username.

$addon='';
if($_POST['parent']) $addon=',parent='.(int)$_POST['parent'];

mysql_query("INSERT INTO wave_comments SET usr='".$user."', comment='".$comment."', dt=NOW()".$addon);

if(mysql_affected_rows($link)==1)
    echo mysql_insert_id($link);
    // If the insert was successful, echo the newly assigned ID
else
    echo '0';
Y por último, está functions.php
funciones.php
if(!defined('INCLUDE_CHECK')) die('You are not allowed to execute this file directly');
function showComment($arr)
{
echo '
<div class="waveComment com-'.$arr['id'].'">
<div class="comment">
<div class="waveTime">'.waveTime($arr['dt']).'</div>
<div class="commentAvatar">
<img src="img/'.strtolower($arr['usr']).'.png" width="30" height="30" alt="'.$arr['usr'].'" />
</div>
<div class="commentText">
<span class="name">'.$arr['usr'].':</span> '.$arr['comment'].'
</div>
<div class="replyLink">
<a href="" onclick="addComment(this,'.$arr['id'].');return false;">add a reply »</a>
</div>
<div class="clear"></div>
</div>';
// Output the comment, and its replies, if any
if($arr['replies'])
{
foreach($arr['replies'] as $r)
showComment($r);
}
echo '</div>';
}
function waveTime($t)
{
$t = strtotime($t);
if(date('d')==date('d',$t)) return date('h:i A',$t);
return date('F jS Y h:i A',$t);
// If the comment was written today, output only the hour and minute
// if it was not, output a full date/time
} El último paso es el más complicado, en este caso el código jQuery.
Paso 4 - jQuery
Todo el código JS se encuentra en script.js . Lo dividiré en dos partes:
script.js - parte 1
$(document).ready(function(){
    // Executed once all the page elements are loaded

    lastVal = totHistory;

    // Create the slider:
    $("#slider").slider({
        value:totHistory,
        min: 1,
        max: totHistory,
        animate: true,
        slide: function(event, ui) {

            if(lastVal>ui.value)
            $(buildQ(lastVal,ui.value)).hide('fast').find('.addComment').remove();
            // Using buildQ to build the jQuery selector
            // If we are moving the slider backward, hide the previous comment

            else if(lastVal<ui.value)
            $(buildQ(lastVal,ui.value)).show('fast');
            // Otherwise show it

            lastVal = ui.value;
        }
    });
});

var totHistory=0;
// Holds the number of comments

var positions = new Array();
var lastVal;

function addHistory(obj)
{
    /* Gets called on page load for each comment, and on comment submit */
    totHistory++;
    positions.push(obj.id);
}

function buildQ(from,to)
{
    /* Building a jQuery selector from the begin
    and end point of the slide */

    if(from>to)
    {
        var tmp=to;
        to=from;
        from=tmp;
    }

    from++;
    to++;

    var query='';
    for(var i=from;i<to;i++)
    {
        if(i!=from) query+=',';
        query+='.com-'+positions[i-1];
    }

    /* Each comment has an unique com-(Comment ID) class
    that we are using to address it */

    return query;
}
Como recordará, generamos una cadena PHP especial, que contiene llamadas a addHistory función. Cada vez que se ejecuta, incrementa el totHistory encimera. Después de cargar todos los comentarios, $(document).ready se ejecuta y el control deslizante se inicializa con totHistory como el valor máximo del control deslizante. El valor mínimo es 1, porque queremos tener al menos un comentario visible.
Ahora echemos un vistazo a la segunda parte del archivo.
script.js - parte 2
function addComment(where,parent)
{
    /*  This functions gets called from both the "Add a comment" button
    on the bottom of the page, and the add a reply link.
    It shows the comment submition form */

    var $el;
    if($('.waveButton').length) return false;
    // If there already is a comment submition form
    // shown on the page, return and exit

    if(!where)
        $el = $('#commentArea');
    else
        $el = $(where).closest('.waveComment');

    if(!parent) parent=0;

    // If we are adding a comment, but there are hidden comments by the slider:
    $('.waveComment').show('slow');
    lastVal = totHistory;

    $('#slider').slider('option','value',totHistory);
    // Move the slider to the end point and show all comments
    var comment = '<div class="waveComment addComment">\
    \
    <div class="comment">\
    <div class="commentAvatar">\
    <img src="img/demo.png" width="30" height="30" />\
    </div>\
    \
    <div class="commentText">\
    \
    <textarea class="textArea" rows="2" cols="70" name="" />\
    <div><input type="button" class="waveButton" value="Add comment" onclick="addSubmit(this,'+parent+')" /> or <a href="" onclick="cancelAdd(this);return false">cancel</a></div>\
    \
    </div>\
    </div>\
    \
    </div>';

    $el.append(comment);
    // Append the form
}

function cancelAdd(el)
{
    $(el).closest('.waveComment').remove();
}

function addSubmit(el,parent)
{
    /* Executed when clicking the submit button */
    var cText = $(el).closest('.commentText');
    var text = cText.find('textarea').val();
    var wC = $(el).closest('.waveComment');
    if(text.length<4)
    {
        alert("Your comment is too short!");
        return false;
    }

    $(el).parent().html('<img src="img/ajax_load.gif" width="16" height="16" />');
    // Showing the loading gif animation
    // Send an AJAX request:

    $.ajax({
        type: "POST",
        url: "ajax/saveComment.php",
        data: "comment="+encodeURIComponent(text)+"&parent="+parent,
        /* Sending both the text and the parent of the comment */
        success: function(msg){

            /* PHP returns the automatically assigned ID of the new comment */
            var ins_id = parseInt(msg);
            if(ins_id)
            {
                wC.addClass('com-'+ins_id);
                addHistory({id:ins_id});
                $('#slider').slider('option', 'max', totHistory).slider('option','value',totHistory);
                lastVal=totHistory;
            }

            transForm(text,cText);
            // Hiding the form and showing the newly-added comment in its place
        }
    });
}

function transForm(text,cText)
{
    var tmpStr ='<span class="name">Demo:</span> '+text;
    cText.html(tmpStr);
}
Las funciones en esta parte del código manejan el envío de comentarios a través de AJAX al PHP backend.
Creo que se necesitan más aclaraciones para el éxito función en el AJAX. Como saben, se llama cuando hemos ejecutado con éxito la solicitud de AJAX (en este caso, se llama si el comentario se escribió en la base de datos MySQL).
Dentro de esta función, verificamos si se devuelve una ID de inserción adecuada, que corresponde a la ID interna de MySQL que se le dio al incremento automático campo (ver más abajo para el MySQL parte o echa un vistazo a table.sql en los archivos de ejemplo).
Si todo está bien, llamamos al addHistory funcionar con los nuevos datos y actualizar el valor máximo del control deslizante. Esto garantiza que el comentario recién agregado se pueda desplazar por el historial con el resto de ellos.
Paso 5:MySQL
Este paso solo es necesario si desea ejecutar la demostración en su propio servidor. Si tiene problemas, lea los comentarios a continuación o escriba uno nuevo si su problema no se aborda allí.
Para poder ejecutar la demostración, debe crear la tabla MySQL wave_comments con el siguiente código (también disponible en table.sql en los archivos de ejemplo):
CREATE TABLE `wave_comments` (
`id` int(11) NOT NULL auto_increment,
`parent` int(11) NOT NULL default '0',
`usr` varchar(16) collate utf8_unicode_ci NOT NULL default '',
`comment` text collate utf8_unicode_ci NOT NULL,
`dt` datetime NOT NULL default '0000-00-00 00:00:00',
PRIMARY KEY  (`id`),
KEY `parent` (`parent`,`id`)
) ENGINE=MyISAM  DEFAULT CHARSET=utf8 COLLATE=utf8_unicode_ci;
¡Con esto, nuestro control deslizante de historial similar a Google Wave está completo!
Conclusión
Puede modificar el código de este ejemplo y utilizarlo en sus propios sitios. También sería genial si compartieras lo que has hecho con la comunidad, a través de nuestra nueva característica:Tutorial Mashups (puedes encontrarlo debajo de cada tutorial).