Introducción
Recientemente, Twitter lanzó una gran característica nueva en su sitio:las listas. Ahora puede crear y compilar una lista de usuarios de Twitter y facilitar que otros los sigan a la vez.
Además, al mismo tiempo, ampliaron su API para incluir la funcionalidad de gestión de listas. Esto nos permite usar estas nuevas herramientas para crear un widget que cambia las listas al revés:una página de fans que puede poner en su barra lateral, que permite a sus visitantes completar su nombre de Twitter y unirse a una lista de fans especialmente diseñada en su cuenta de Twitter. cuenta.
¡Así que descargue los archivos de ejemplo y comencemos a codificar!
Paso 1 - XHTML
Como de costumbre, comenzamos con el XHTML. Como el widget está completamente basado en AJAX, este es el único código que deberá incluir directamente en su sitio. El resto se recupera de forma asíncrona.
demostración.html
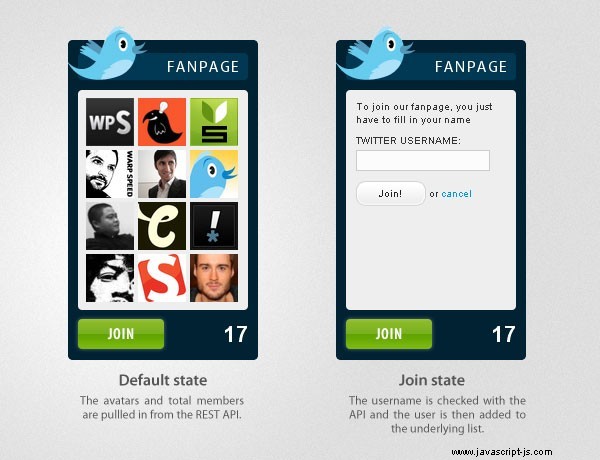
<div id="fanPage">

<div class="title">

<a class="fanPageLink" href="http://twitter.com" title="Go to fanpage!"><img src="img/twitter-bird.png" id="twitBird" alt="twitter bird" /></a>
<a class="fanPageLink" href="http://twitter.com" title="Go to fanpage!">Fanpage</a>

</div>

<div class="content">
<div class="fans"><img src="img/loader.gif" alt="loading.." /></div>
</div>

<div class="subscribe">
<a href="#" class="joinFP">Join!</a>

<div class="membersCount">
<a class="fanPageLink" id="counter" href="http://twitter.com" title="Total Fans"></a>
</div>

</div>
</div>
Aquí tenemos la fanPage principal contenedor DIV, que contiene nuestro widget y dentro de él tenemos el título , contenido y suscríbete DIV.
Posteriormente, estos se diseñan con CSS y se completan con datos a través de AJAX. También observe que tenemos tres enlaces que comparten un FanPageLink clase. Actualmente apuntan al sitio principal de twitter, pero más adelante vamos a editar su href atributos dinámicamente y apúntelos a la página de miembros de la lista.

Paso 2:CSS
Una vez que tengamos el marcado en su lugar, podemos pasar al CSS. Aquí solo se presentan las reglas que utiliza directamente el widget. Puede ver todo el código en demo.css en el archivo fuente.
demostración.css
#fanPage{
/* This is the container that holds the widget */
background-color:#002233;
color:white;
height:300px;
margin:30px auto;
padding:10px;
text-align:left;
width:170px;
}
#fanPage a, #fanPage a:visited{
/* This styles the title and total fans links */
color:white;
text-decoration:none;
}
#fanPage a:hover{
text-decoration:underline;
}
.title{
/* The title on the top */
background-color:#013853;
font-family:"Myriad Pro",Arial,Helvetica,sans-serif;
font-size:16px;
letter-spacing:1px;
margin:3px 0 10px;
padding:4px 8px;
position:relative;
text-align:right;
text-transform:uppercase;
}
#twitBird{
/* The twitter icon on the top */
left:-10px;
position:absolute;
top:-28px;
}
.content{
/* The div that holds the twitter avatars */
background-color:#eeeeee;
padding:6px;
text-align:left;
height:208px;
position:relative;
color:#333333;
}
#mask{
/* Inserted once you click the green "Join" button */
font-size:10px;
left:0;
padding:10px;
position:absolute;
top:0;
}
#mask label{
display:block;
font-weight:bold;
margin:8px 0 4px;
text-transform:uppercase;
}
#twitterName{
/* The twitter name input box */
background-color:#FCFCFC;
border:1px solid #CCCCCC;
color:#333333;
font-family:Arial,Helvetica,sans-serif;
font-size:12px;
padding:2px;
}
#mask a.greyButton,#mask a.greyButton:visited{
/* The default state of the gray join button */
display:inline-block;
height:19px;
margin-top:10px;
padding:6px 0 0;
text-align:center;
width:70px;
background:url(img/button_gray.png) no-repeat;
color:#222222;
}
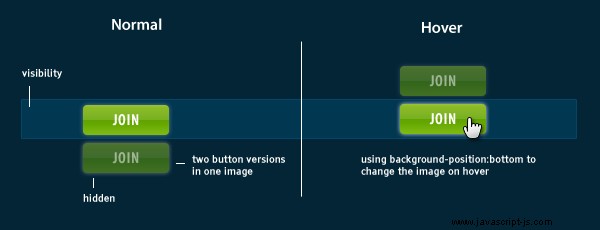
#mask a.greyButton:hover{
/* The hover effect on the "Join" button */
background-position:bottom left;
text-decoration:none;
}
div#mask a, div#mask a:hover, div#mask a:visited{
color:#0196e3;
}
#response{
/* The div that holds the response messages in the "Join area" */
margin-top:10px;
font-size:10px;
text-align:center;
}
.subscribe{
position:relative;
}
.membersCount{
/* The total number of fans div */
position:absolute;
right:0;
top:5px;
color:white;
display:block;
font-size:22px;
font-weight:bold;
}
.content img{
/* The twitter avatars */
margin:2px;
}
#fanPage, .content, .title{
/* Rounding three elements at once */
-moz-border-radius:4px;
-webkit-border-radius:4px;
border-radius:4px;
}
a.joinFP, a.joinFP:hover{
/* The green "Join" button */
display:block;
background:url(img/buttons.png) no-repeat;
width:94px;
height:38px;
text-indent:-9999px;
margin:5px 0 0 -4px;
}
a.joinFP:hover{
/* The hover state of the button */
background-position:bottom left;
}
a img{
border:none;
} Nada innovador aquí. Observe cómo hemos configurado las reglas de esquinas redondeadas de CSS para tres tipos de elementos a la vez (línea 127 ). De esta forma, facilitamos la edición de la redondez del widget (sería aún mejor si todos los navegadores admitieran el radio del borde directamente y no necesitaran un código específico del proveedor).
También puedes ver una demostración de la técnica que usé para hacer los botones flotantes a continuación.
Paso 3:jQuery
Como mencioné anteriormente, todo el widget está basado en AJAX. En realidad, esto es una necesidad, porque la comunicación con la API de Twitter detendría el sitio web de lo contrario.
Esta es la idea principal detrás del siguiente código:
- La página en la que se incluye el widget se carga en el navegador del visitante;
- Con él, script.js (que contiene todo nuestro código jQuery) se ejecuta;
- $(documento).listo() se ejecuta;
- Se inicia una solicitud AJAX, que carga los datos de load.php y los muestra en caso de éxito;
- Todos los enlaces con un fanPageLink la clase se dirige a la página de miembros de la lista en twitter;
- Una función de clic está vinculada al botón verde para unirse;
Primera mitad de script.js
$(document).ready(function(){
    /* Executed on DOM load */

    $.getJSON("load.php",function(data){

        /* Loading the widget data */
        if(data.error)
        {
            /* If there is an error, output and exit */
            $(".content").html(data.error);
            return false;
        }

        $(".content .fans").html('');
        /* Remove the rotating GIF */

        $.each(data.members,function(i,val){

            /* Loop through all the shown members and add them to the .content DIV */
            $(".content .fans").append('<a href="http://twitter.com/'+i+'" target="_blank"><img src="'+val+'" width="48" height="48" title="'+i+'" alt="'+i+'" /></a>');
        });

        $('#counter').html(data.membersCount);
        /* Set the member counter */

        $('.fanPageLink').attr('href',data.fanPage+'/members').attr('target','_blank');
        /* Set the .fanPageLink-s to point to the profile page */
    });

    $('.joinFP').click(function(e){

        /* IF the green button has been clicked.. */

        if($('.content').html().indexOf('id="mask"')!=-1)
        {
            /* ..and the form is already shown exit */
            e.preventDefault();
            return false;
        }

        /* ..in the other case, start a fade out effect */
        $(".content .fans").fadeOut("slow",function(){

            $('.content').append('<div id="mask">\
            To join our fan page, you just have to fill in your name\
            <label>Twitter username:</label>\
            <input id="twitterName" name="twitter" type="text" size="20" />\
            <a href="" class="greyButton" onclick="sendData();return false;">Join!</a> or <a href="#" onclick="cancel();return false;">cancel</a>\
            <div id="response"></div>\
            </div>');
        });

        /* Prevent the link from redirecting the page */
        e.preventDefault();
    });
});
Más tarde, si se hace clic en el botón verde "Unirse", los avatares desaparecen y aparece un formulario en su lugar.
La segunda mitad del código maneja el envío de los datos a add.php :
Segunda mitad de script.js
function sendData()
{
    /* This function sends the form via AJAX */
    $('#response').html('<img src="img/loader.gif" />');
    var twitter = $('#twitterName').val();
    if(!twitter.length)
    {
        $('#response').html('<span style="color:red">Please fill in your twitter username.</span>');
        return false;
    }

    $.ajax({
        type: "POST",
        url: "add.php",
        data: "twitter="+encodeURIComponent(twitter),
        /* Sending the filled in twitter name */
        success: function(msg){

            /* PHP returns 1 on success, and 0 on error */
            var status = parseInt(msg);

            if(status)
            {
                $('#response').html('Thank you for being a fan! You will be added in a few minutes. <a href="#" onclick="cancel();return false">Hide this form</a>.');
                $('#twitterName').val('');
            }
            else
                $('#response').html('<span style="color:red">There is no such twitter user.</span>');
        }
    });
}

function cancel()
{
    /* Hides the "Join" form */
    $('#mask').remove();
    $('.content .fans').fadeIn('slow');
}
Se llama a la función sendData si el usuario hace clic en el botón gris "Unirse" recién creado debajo del campo de entrada. También verifica el estado de devolución de la solicitud AJAX para elegir el mensaje de estado adecuado.
También recuerde que para el trabajo del código anterior, debemos incluir la biblioteca jQuery y script.js en la sección de encabezado del documento:
<script type="text/javascript" src="http://ajax.googleapis.com/ajax/libs/jquery/1.3.2/jquery.min.js"></script>
<script type="text/javascript" src="script.js"></script>
Paso 4 - PHP
Ahora que seguimos todo el código en el front-end, ahora es el momento de la última parte de este tutorial:el back-end de PHP.
PHP tiene la importante tarea de comunicarse con la API de Twitter. Esto se hace a través de una extensión especial - CURL . Por conveniencia, hice una función especial - curlMe que envuelve el código CURL y facilita el envío de solicitudes desde otros lugares en el script.
funciones.php
function error($msg)
{
    // Format the error as a JSON object and exit the script:
    die('{error:"'.$msg.'"}');
}

function fetchElement($element,$src)
{
    // Takes in an XML document as string $src, and returns the required nod value

    $match = array();
    preg_match_all('/<'.$element.'>(.*)<\/'.$element.'>/u',$src,$match);
    // Matching the required property in the xml

    return $match[1];

    // ..and returning it
}

function curlMe($url,$gp='')
{
    // Using CURL to communicate with the Twitter API

    global $username,$password;

    $cc = curl_init();

    curl_setopt($cc, CURLOPT_URL, $url);

    if($gp)
    {
        // If the $gp parameter is set, send it by a POST request:
        curl_setopt($cc, CURLOPT_POST, 1);
        curl_setopt($cc, CURLOPT_POSTFIELDS, $gp);
    }
    else
        curl_setopt($cc, CURLOPT_GET, 1);

    curl_setopt($cc, CURLOPT_HTTPAUTH, CURLAUTH_BASIC);
    curl_setopt($cc, CURLOPT_USERPWD, $username.':'.$password);
    curl_setopt($cc, CURLOPT_SSL_VERIFYPEER, false);
    curl_setopt($cc, CURLOPT_RETURNTRANSFER, 1);

    $xml = curl_exec($cc);
    curl_close($cc);

    return $xml;
}
Ahora que hemos definido esas funciones, podemos usarlas en cualquier archivo PHP simplemente incluyendo o requiriendo functions.php en el guión.
La adición de nuevos fans a la lista se realiza en add.php
añadir.php
require "functions.php";
require "config.php";

if(!$_POST['twitter'])
die('0');

$userXML = curlMe("http://twitter.com/users/show.xml?screen_name=".urlencode($_POST['twitter']));
// Initiating an API request

if(strpos($userXML,'<error>Not found</error>') !== false)
{
    // If there is no such user, return an error:
    die('0');
}

// fetchElement returns an array, and the list function assigns its first element to $id:
list($id) = fetchElement('id',$userXML);

curlMe('http://api.twitter.com/1/'.$username.'/'.$list.'/members.xml','id='.$id);

echo 1;
Como con cualquier API, existen límites de uso. Esto se hace para evitar el abuso del servicio y arruinar el día de todos. Twitter impone una regla de 150 solicitudes por hora, que limita la cantidad de veces que podemos OBTENER datos para la lista de Twitter.
Es por eso que construí un mecanismo de almacenamiento en caché simple, que almacena los datos obtenidos durante 15 minutos después de que se realiza una solicitud a la API.
Así es como funciona:
- El widget realiza una solicitud AJAX a load.php;
- El script php verifica si existe un archivo de caché;
- Si lo hace, obtiene su contenido y lo devuelve;
- Si no es así, o si el caché tiene más de 15 minutos, obtiene los datos de la API, los almacena en el archivo de caché para su uso posterior y los devuelve;
Este mecanismo simple asegura que el widget siempre tendrá llamadas API de sobra. Puedes ver el código a continuación:
cargar.php
require "functions.php";
require "config.php";

$cache_file = 'twitter.cache';
// The cache file

$cache_expire_time = 15*60;
// The cache expires after 15 minutes

$twitterers_shown = 12;

// If you are making changes and want to destroy the cache while testing,
// uncomment the line below:

//$cache_expire_time = 1;

if(!file_exists($cache_file) || time() - filemtime($cache_file) > $cache_expire_time)
{
    // If there isn't a cache file, or if it is older than allowed

    $xml = curlMe("http://api.twitter.com/1/".$username."/".$list."/members.xml");
    //$xml = curlMe("http://api.twitter.com/1/chouka/design/members.xml");

    if(strpos($xml,'<error>Not found</error>') !== false)
    {
        // If there is not such a list, create it automatically:
        curlMe('http://api.twitter.com/1/'.$username.'/lists.xml','name='.$list);
    }

    $usernames = fetchElement('screen_name',$xml);
    $avatars = fetchElement('profile_image_url',$xml);

    $json = '';
    foreach($usernames as $k=>$u)
    {
        if($k!=0) $json.=', ';
        $json.='"'.$u.'":"'.$avatars[$k].'"';
        // Generating the json object with a structure: username:avatar_image

        if($k>=$twitterers_shown-1) break;
    }

    // Getting the total number of fans requires an additional API call:

    $membersXML = curlMe("http://api.twitter.com/1/".$username."/lists/".$list.".xml");
    $membersCount = fetchElement('member_count',$membersXML);

    $json = '{members:{'.$json.'}, membersCount:'.$membersCount[0].',fanPage:"http://twitter.com/'.$username.'/'.$list.'"}';

    // Save the generated json variable in the cache for later use:
    $fp = fopen($cache_file,'w');

    if($fp == false)
    {
        error("Your cache file could not be created! You have to chmod the script directory to 777!");
    }

    fwrite($fp,$json);
    fclose($fp);
}
else
{
    $json = file_get_contents($cache_file);
    // Fetch the data from the cache file
}

echo $json;
También puede notar que la API requiere que proporcione su nombre de usuario y contraseña para poder usarla. Entonces, si planea ejecutar la demostración en su propio servidor, asegúrese de completar su información de inicio de sesión en config.php .
¡Con esto, nuestra página de fans impulsada por la lista de Twitter está completa!
Conclusión
Hoy aprendimos cómo usar las listas de Twitter recientemente lanzadas y la API REST para crear una página de fans impulsada por la comunidad.
Como recordarán, este no es el primer widget de Twitter que hemos creado. Si solo desea mostrar sus últimos tweets en su blog, puede usar el jQuery Twitter Ticker que creamos hace unas semanas.
Además, si ha personalizado este tutorial y lo ha utilizado en un sitio, sería genial compartir lo que ha hecho con la comunidad a través de nuestros Tutorial Mashups. función, encima de la sección de comentarios.