Introducción
En este tutorial vamos a crear un carrito de compras controlado por AJAX. Todos los productos se almacenarán en una base de datos MySQL, con PHP mostrando y procesando los datos.
jQuery impulsará los AJAX-es en la página y, con la ayuda del complemento simpletip, se agregará a un proceso de pago interactivo.
Así que adelante, descargue los archivos de demostración y empieza a leer.
Paso 1:la base de datos MySQL
Si desea configurar una demostración funcional, deberá ejecutar el siguiente código SQL en su administrador de base de datos (por ejemplo, phpMyAdmin). Preparará la mesa e insertará algunos productos. El código también está disponible en table.sql en los archivos de demostración.
tabla.sql
CREATE TABLE IF NOT EXISTS `internet_shop` (
  `id` int(6) NOT NULL auto_increment,
  `img` varchar(32) collate utf8_unicode_ci NOT NULL default '',
  `name` varchar(64) collate utf8_unicode_ci NOT NULL default '',
  `description` text collate utf8_unicode_ci NOT NULL,
  `price` double NOT NULL default '0',
  PRIMARY KEY  (`id`),
  UNIQUE KEY `img` (`img`)
) ENGINE=MyISAM  DEFAULT CHARSET=utf8 COLLATE=utf8_unicode_ci AUTO_INCREMENT=7 ;

INSERT INTO `internet_shop` VALUES(1, 'iPod.png', 'iPod', 'The original and popular iPod.', 200);
INSERT INTO `internet_shop` VALUES(2, 'iMac.png', 'iMac', 'The iMac computer.', 1200);
INSERT INTO `internet_shop` VALUES(3, 'iPhone.png', 'iPhone', 'This is the new iPhone.', 400);
INSERT INTO `internet_shop` VALUES(4, 'iPod-Shuffle.png', 'iPod Shuffle', 'The new iPod shuffle.', 49);
INSERT INTO `internet_shop` VALUES(5, 'iPod-Nano.png', 'iPod Nano', 'The new iPod Nano.', 99);
INSERT INTO `internet_shop` VALUES(6, 'Apple-TV.png', 'Apple TV', 'The new Apple TV. Buy it now!', 300);
Después de esto, debe completar sus credenciales de MySQL en connect.inc.php .
Paso 2:el XHTML
Primero comenzamos con nuestro marcado principal.
demo.php
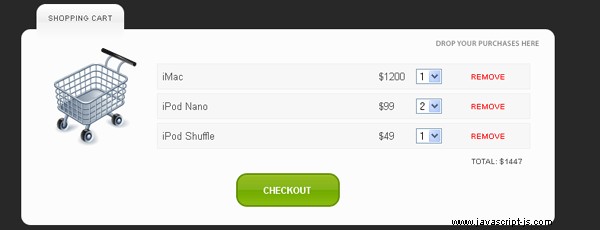
<div id="main-container"> <!-- the main container element -->

<div class="tutorialzine">    <!-- some headings -->
<h1>Shopping cart</h1>
<h3>The best products at the best prices</h3>
</div>

<div class="container">   <!-- the first section - products -->

<span class="top-label">
<span class="label-txt">Products</span> <!-- section label -->
</span>

<div class="content-area">
<div class="content drag-desired">    <!-- assigning a common content class and an individually targeted drag-desired class -->

<?php
// php code that generates the products
?>

<div class="clear"></div>   <!-- clearing the floats -->
</div>
</div>

<div class="bottom-container-border"> <!-- bottom part of the section -->
</div>

</div>    <!-- closing the products section -->

<div class="container">   <!-- the second section - shopping cart -->

<span class="top-label">
<span class="label-txt">Shopping Cart</span>    <!-- label for the section -->
</span>

<div class="content-area">
<div class="content drop-here">   <!-- content class, shared with the product section above, and the targeted drop-here class -->
<div id="cart-icon">
<img src="img/Shoppingcart_128x128.png" alt="shopping cart" class="pngfix" width="128" height="128" />    <!-- using the pngfix class -->
<img src="img/ajax_load_2.gif" alt="loading.." id="ajax-loader" width="16" height="16" /> <!-- the rotating gif - hidden by default and shown during ajax interactions -->
</div>

<form name="checkoutForm" method="post" action="order.php">   <!-- the form -->
<div id="item-list">  <!-- in this div we insert all the products in the shopping cart -->

</div>
</form>   <!-- closing the form -->

<div class="clear"></div>   <!-- clearing -->

<div id="total"></div>  <!-- the total price goes here -->
<div class="clear"></div>   <!-- clearing the floats -->

<a href="" onclick="document.forms.checkoutForm.submit(); return false;" class="button">Checkout</a>    <!-- the submit button, hidden by default, notice the onclick attribute -->

</div>
</div>

<div class="bottom-container-border"> <!-- bottom part of the section -->
</div>

</div><!-- closing the main container -->
Como puede ver, hemos organizado nuestro contenido en dos secciones principales, que son casi idénticas en el marcado XHTML que utilizan:la primera, donde se muestran todos los productos, y la segunda, que actúa como una tarjeta de compras.
A continuación puede ver una explicación detallada de la estructura de la sección de productos.

Los productos son generados por nuestro código PHP, como puede ver en la línea 18. Profundizaremos en esto en unos minutos. Ahora echemos un vistazo a cómo convertimos el diseño XHTML en un diseño terminado.
Paso 3:el CSS
Esta vez el código CSS es bastante largo, así que lo dividiré en partes.
demostración.css
body,h1,h2,h3,p,td,quote,small,form,input,ul,li,ol,label{
/* resetting some of the styles for browser compatibility */
    margin:0px;
    padding:0px;
    font-family:Arial, Helvetica, sans-serif;
}

body{
    color:#555555;
    font-size:13px;
    background-color:#282828;
}

.clear{ /* implementing the clear-fix hack for fixing floated layouts */
    clear:both;
}

#main-container{    /* this is the main container, holding the two sections */
    width:700px;
    margin:20px auto;
}

.container{ /* the main container of our content sections - the products and the shopping cart */
    margin-bottom:40px;
}

.top-label{ /* the outer span comprising the label */
    background:url(img/label_bg.png) no-repeat; /* showing the left part of label_bg.png - a wide round-cornered image */
    display:inline-block;
    margin-left:20px;
    position:relative;
    margin-bottom:-15px;    /* the whole label is lowered on the product section */
}

.label-txt{ /* the inner span - red border in the illustration above */
    background:url(img/label_bg.png) no-repeat top right;   /* shows the right part of the wider label_bg.png */
    display:inline-block;
    font-size:10px;
    height:36px;
    margin-left:10px;   /* leaves space on the left, so that the outer span can show its background */
    padding:12px 15px 0 5px;
    text-transform:uppercase;
}

.content-area{  /* The top part of the rounded container image, see the illustration above */
    background:url(img/container_top.png) no-repeat #fcfcfc;
    padding:15px 20px 0 20px;
}

.content{   /* shared by the two sections */
    padding:10px;
}

.drag-desired{  /* individually targeted properties */
    background:url(img/drag_desired_label.png) no-repeat top right;
    padding:30px;
}

.drop-here{ /* not shared with the other sections */
    background:url(img/drop_here_label.png) no-repeat top right;
}

.bottom-container-border{   /* the bottom rounded graphic, that completes the section */
    background:url(img/container_bottom.png) no-repeat;
    height:14px;
}

.product{   /* styling the products */
    border:2px solid #F5F5F5;
    float:left;
    margin:15px;
    padding:10px;
}

.product img{
    cursor:move;
}

p.descr{
    padding:5px 0;
}

small{
    display:block;
    margin-top:4px;
}

.tooltip{   /* the tooltips, this div is created by the simpletip plugin */
    position: absolute;
    top: 0;
    left: 0;
    z-index: 3;
    display: none;

    background-color:#666666;
    border:1px solid #666666;
    color:#fcfcfc;

    padding:10px;

    -moz-border-radius:12px;    /* rounded corners */
    -khtml-border-radius: 12px;
    -webkit-border-radius: 12px;
    border-radius:12px;
}
Observe la clase de información sobre herramientas. Es creado automáticamente por el complemento simpletip , pero no tiene estilos aplicados por defecto. Es por eso que lo diseñamos aquí. He usado el border-radius propiedad, que aún no es compatible con todos los navegadores, pero se degradará con gracia para aquellos que no lo sean.
Ahora echemos un vistazo a los estilos que apuntan a la sección del carrito de compras.
#cart-icon{  /* the div that contains the shopping cart icon */
    width:128px;
    float:left;
    position:relative;  /* changing the position to relative so that ajax-loader is positioned relative to it */
}

#ajax-loader{
    position:absolute;  /* absolute positioning makes an element relative to its parent if the latter has positioning different from the default  */
    top:0px;
    left:0px;
    visibility:hidden;
}

#item-list{ /* the contents of the shopping cart goes into this div */
    float:left;
    width:490px;
    margin-left:20px;
    padding-top:15px;
}

a.remove,a.remove:visited{  /* the REMOVE link */
    color:red;
    font-size:10px;
    text-transform:uppercase;
}

#total{ /* the total cost div */
    clear:both;
    float:right;
    font-size:10px;
    font-weight:bold;
    padding:10px 12px;
    text-transform:uppercase;
}

#item-list table{   /* every product in the shopping cart is positioned inside the item-list div */
    background-color:#F7F7F7;
    border:1px solid #EFEFEF;
    margin-top:5px;
    padding:4px;
}

a.button,a.button:visited{  /* the CHECKOUT button */
    display:none;

    height:29px;
    width:136px;

    padding-top:15px;
    margin:0 auto;
    overflow:hidden;

    color:white;
    font-size:12px;
    font-weight:bold;
    text-align:center;
    text-transform:uppercase;

    background:url(img/button.png) no-repeat center top;    /* showing only the top part of the background image */
}

a.button:hover{
    background-position:bottom; /* on hover we show the bottom part of the image */
    text-decoration:none;
}

/* Some less interesting classes */

a, a:visited {
    color:#00BBFF;
    text-decoration:none;
    outline:none;
}

a:hover{
    text-decoration:underline;
}

h1{
    font-size:28px;
    font-weight:bold;
    font-family:"Trebuchet MS",Arial, Helvetica, sans-serif;
}

h2{
    font-weight:normal;
    font-size:20px;

    color:#666666;
    text-indent:30px;
    margin:20px 0;
}

.tutorialzine h1{
    color:white;
    margin-bottom:10px;
    font-size:48px;
}

.tutorialzine h3{
    color:#F5F5F5;
    font-size:10px;
    font-weight:bold;
    margin-bottom:30px;
    text-transform:uppercase;
}

.tutorial-info{
    color:white;
    text-align:center;
    padding:10px;
    margin-top:-20px;
}
Como le dirá cualquier desarrollador front-end, falta algo aquí. Lo has adivinado:tratamiento especial para IE6 .
Personalmente planeo dejar de admitir IE6 pronto en mis proyectos por completo; si no fuera por él, el código anterior habría sido al menos un cuarto más corto y habría llevado mucho menos tiempo depurarlo.
Pero de todos modos, así es como apuntamos específicamente a IE6:
demo.php
<!--[if lt IE 7]>
<style type="text/css">
    .pngfix { behavior: url(pngfix/iepngfix.htc);}  /* this is a special htc file that fixes the IE6 transparency issues */
    .tooltip{width:200px;}; /* provide a default width for the tooltips */
</style>
<![endif]-->
Ahí. Ahora echemos un vistazo al backend de PHP.
Paso 4 - PHP
Usamos PHP de varias formas y lugares. Primero veamos cómo se genera la lista de productos en la página principal.
demo.php
$result = mysql_query("SELECT * FROM internet_shop");    // selecting all the products
while($row=mysql_fetch_assoc($result))
{
    echo '<div class="product"><img src="img/products/'.$row['img'].'" alt="'.htmlspecialchars($row['name']).'" width="128" height="128" class="pngfix" /></div>';
}
Otro lugar donde usamos PHP es en tips.php , que toma un nombre de archivo de imagen como parámetro, verifica qué producto está asociado con esa imagen y genera los datos de información sobre herramientas como html. Esto es utilizado más tarde por el simpletip complemento.
ajax/tips.php
define('INCLUDE_CHECK',1);
require "../connect.php";

if(!$_POST['img']) die("There is no such product!");

$img=mysql_real_escape_string(end(explode('/',$_POST['img'])));

$row=mysql_fetch_assoc(mysql_query("SELECT * FROM internet_shop WHERE img='".$img."'"));

if(!$row) die("There is no such product!");

echo '<strong>'.$row['name'].'</strong>
<p class="descr">'.$row['description'].'</p>
<strong>price: $'.$row['price'].'</strong>
<small>Drag it to your shopping cart to purchase it</small>';
También usamos PHP para devolver los datos necesarios para la adición de productos en el carrito de compras. La diferencia es que esta vez devolvemos los datos como JSON (un objeto javascript).
ajax/addtocart.php
define('INCLUDE_CHECK',1);
require "../connect.php";

if(!$_POST['img']) die("There is no such product!");

$img=mysql_real_escape_string(end(explode('/',$_POST['img'])));
$row=mysql_fetch_assoc(mysql_query("SELECT * FROM internet_shop WHERE img='".$img."'"));

echo '{status:1,id:'.$row['id'].',price:'.$row['price'].',txt:\'\
\
<table width="100%" id="table_'.$row['id'].'">\
<tr>\
<td width="60%">'.$row['name'].'</td>\
<td width="10%">$'.$row['price'].'</td>\
<td width="15%"><select name="'.$row['id'].'_cnt" id="'.$row['id'].'_cnt" onchange="change('.$row['id'].');">\
<option value="1">1</option>\
<option value="2">2</option>\
<option value="3">3</option></slect>\
\
</td>\
<td width="15%"><a href="#" onclick="remove('.$row['id'].');return false;" class="remove">remove</a></td>\
</tr>\
</table>\'}';
El objeto generado tiene estado , identificación , precio y texto propiedades. Estos son utilizados por nuestras funciones AJAX como verá en un momento.
Observe cómo he escapado de cada línea de la cadena con una barra invertida. Esto se hace porque javascript no admite cadenas de varias líneas.
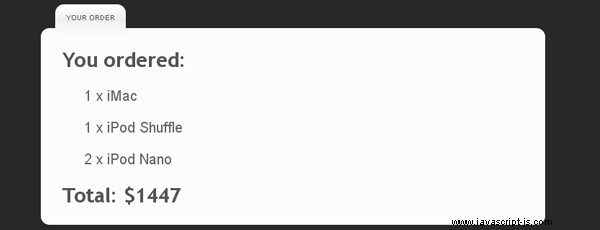
El último lugar donde usamos PHP es order.php , que se utiliza para procesar los pedidos. Actualmente, solo emite su pedido. Puede modificarlo para incluir un formulario de correo electrónico, funcionalidad de PayPal o cualquier cosa que lo convierta en una tienda en línea funcional.
pedido.php
<?php

define('INCLUDE_CHECK',1);
require "connect.php";

if(!$_POST) // if there is no data submitted to the form
{
    if($_SERVER['HTTP_REFERER'])    // redirect
    header('Location : '.$_SERVER['HTTP_REFERER']);
    exit;   // and exit
}

?>

<!-- XHTML code.. -->

<?php

$cnt = array();
$products = array();

foreach($_POST as $key=>$value)
{
    $key=(int)str_replace('_cnt','',$key);
    $products[]=$key;   // store the product ids in an array
    $cnt[$key]=$value;  // create a key / value pair where for each product id there is a corresponding value being the number of products
 purchased}

$result = mysql_query("SELECT * FROM internet_shop WHERE id IN(".join($products,',').")");  // selecting all the products with the IN() function

if(!mysql_num_rows($result))    // no products found
{
    echo '<h1>There was an error with your order!</h1>';
}
else
{
    echo '<h1>You ordered:</h1>';
    while($row=mysql_fetch_assoc($result))
    {
        echo '<h2>'.$cnt[$row['id']].' x '.$row['name'].'</h2>';
        $total+=$cnt[$row['id']]*$row['price'];
    }

    echo '<h1>Total: $'.$total.'</h1>';
}

?>
Esto concluye la sección de PHP. Lo único que queda es algo de magia jQuery.
Paso 5:jQuery
Utilizaremos jQuery al máximo, por lo que necesitaremos incluir la biblioteca adicional de jQuery UI, así como la biblioteca básica.
<script type="text/javascript" src="http://ajax.googleapis.com/ajax/libs/jquery/1.3.2/jquery.min.js"></script>
<script type="text/javascript" src="http://ajax.googleapis.com/ajax/libs/jqueryui/1.7.2/jquery-ui.min.js"></script>
<script type="text/javascript" src="simpletip/jquery.simpletip-1.3.1.pack.js"></script> <!-- the jQuery simpletip plugin -->
<script type="text/javascript" src="script.js"></script> <!-- our script.js file -->
Ahora podemos continuar con nuestro script.
secuencia de comandos.js
var purchased=new Array();    //an array containing all the products we've purchased so far
var totalprice=0;   //the total price

$(document).ready(function(){

    $('.product').simpletip({   //using the simpletip plugin

        offset:[40,0],
        content:'<img style="margin:10px;" src="img/ajax_load.gif" alt="loading" />', // default content
        onShow: function(){

            var param = this.getParent().find('img').attr('src');
            // fix for IE6
            if($.browser.msie && $.browser.version=='6.0')
            {
                param = this.getParent().find('img').attr('style').match(/src=\"([^\"]+)\"/);
                param = param[1];
            }

            // after the tooltip is shown, load the tips.php file and pass the image name as a parameter
            this.load('ajax/tips.php',{img:param});
        }

    });

    $(".product img").draggable({   // enable all product images to be dragged

    containment: 'document',
    opacity: 0.6,
    revert: 'invalid',
    helper: 'clone',
    zIndex: 100

    });

    $("div.content.drop-here").droppable({  // convert the shopping cart to a droppable

            drop:
                function(e, ui)
                {
                    var param = $(ui.draggable).attr('src');
                    // IE6 fix
                    if($.browser.msie && $.browser.version=='6.0')
                    {
                        param = $(ui.draggable).attr('style').match(/src=\"([^\"]+)\"/);
                        param = param[1];
                    }

                    addlist(param); // the special addlist function - see below
                }

    });

});
La idea principal aquí es que usamos el src de una imagen atributo como una clave única que se envía al back-end de PHP. Cada producto en la base de datos tiene un nombre de archivo archivado, lo que nos permite encontrar el producto por su imagen de producto.
Todo este bloque de código se ejecuta después de que la página haya terminado de cargarse, por lo que estamos seguros de que todos los elementos de la página están inicializados.
A continuación se muestra la segunda parte de script.js .
function addlist(param)
{
    // the addlist function ads a product to the shopping cart

    $.ajax({    // sending an ajax request to addtocart.php
    type: "POST",
    url: "ajax/addtocart.php",
    data: 'img='+encodeURIComponent(param), // the product image as a parameter
    dataType: 'json',   // expecting json
    beforeSend: function(x){$('#ajax-loader').css('visibility','visible');},    // showing the loading gif
    success: function(msg){

        $('#ajax-loader').css('visibility','hidden');   // hiding the loading gif animation
        if(parseInt(msg.status)!=1)
        {
            return false;   // if there has been an error, return false
        }
        else
        {
            var check=false;
            var cnt = false;

            for(var i=0; i<purchased.length;i++)
            {
                if(purchased[i].id==msg.id) // find if we have already bought this prduct
                {
                    check=true;
                    cnt=purchased[i].cnt;

                    break;
                }
            }

            if(!cnt)    // if we haven't bought it yet, or we have removed it from the purchases, we insert it in the shopping cart
                $('#item-list').append(msg.txt);

            if(!check)  // if we haven't bought it yet, insert it in the purchased array
            {
                purchased.push({id:msg.id,cnt:1,price:msg.price});
            }

            else    // else if we've bought it
            {
                if(cnt>=3) return false; // 3 products of type max

                purchased[i].cnt++;
                $('#'+msg.id+'_cnt').val(purchased[i].cnt); // update the select box
            }

            totalprice+=msg.price;  // recalculate the price
            update_total(); // update the total div

        }

        $('.tooltip').hide();   // hiding the tooltip (sometimes it stays on screen after the drag)

    }
    });
}

function findpos(id)    // a helper function that finds the position at which the product is inserted in the array, returns the position
{
    for(var i=0; i<purchased.length;i++)
    {
        if(purchased[i].id==id)
            return i;
    }

    return false;
}

function remove(id) // remove a product from the shopping cart
{
    var i=findpos(id);  // find its position in the array

    totalprice-=purchased[i].price*purchased[i].cnt;    // recalculate the price
    purchased[i].cnt = 0;   // reset the counter

    $('#table_'+id).remove();   // remove it from the cart
    update_total(); // update the total price counter on the page
}

function change(id) // evoked when we change the number of products via the select area
{
    var i=findpos(id);

    totalprice+=(parseInt($('#'+id+'_cnt').val())-purchased[i].cnt)*purchased[i].price;

    purchased[i].cnt=parseInt($('#'+id+'_cnt').val());
    update_total();
}

function update_total() // function that updates the total price div on the page
{
    if(totalprice)
    {
        $('#total').html('total: $'+totalprice);    // if we've bought somehitng, show the total price div and the purchase button
        $('a.button').css('display','block');
    }
    else    // hide them
    {
        $('#total').html('');
        $('a.button').hide();
    }
}
Hay algunos lugares en este código, donde usamos un id para señalar un producto. El identificador es un identificador único, que es asignado por la base de datos MySQL una vez que insertamos un nuevo elemento.
Lo pasan las solicitudes de AJAX y necesitamos traducirlo a la posición de índice de nuestra matriz de productos para poder usarlo, que es el propósito de findpos() función.
¡Con esto nuestro carrito de compras está completo!
Conclusión
Hoy hicimos un carrito de compras funcional impulsado por AJAX. Eres libre de descargar el código y modificarlo como quieras. Puede desarrollarlo e incluso convertirlo en una tienda en línea completa.