Este libro es una guía para comenzar a usar React Native para el desarrollo de iOS móvil. Puede encontrar el código fuente y el manuscrito en https://github.com/azat-co/react-native-quickly. Puede leer este libro en línea aquí, o en reactnativequickly.com, o si prefiere videos , puede ver videos de proyectos en Node.University: http://node.university/courses/react-native-quickly.
En este libro, le presentaré React Native para el desarrollo nativo de Android y iOS móvil... y lo haré rápidamente. Cubriremos temas como
- Por qué React Native es increíble
- Configuración de React Native Development para iOS
- Hola mundo y la CLI de React Native
- Estilos y Flexbox
- Componentes principales de la interfaz de usuario nativa de React
- Importación de módulos en un proyecto Xcode
- Proyecto:Temporizador
- Proyecto:aplicación meteorológica
Este libro trata sobre cómo comenzar con React rápidamente y no sobre React Native, que técnicamente es una biblioteca separada (o algunos incluso podrían llamarlo un marco). Pero pensé que después de ocho capítulos de trabajar con React para el desarrollo web, sería divertido aplicar nuestro conocimiento al desarrollo móvil aprovechando esta increíble biblioteca. Te sorprenderá la cantidad de habilidades de React Native que ya conoces de React.
Siempre hay un equilibrio entre hacer ejemplos demasiado complejos o demasiado simples y, por lo tanto, poco realistas e inútiles. En este libro, prepárese para crear dos aplicaciones móviles:las aplicaciones Timer y Weather. La aplicación Weather tiene 3 screencasts que puedes ver en Node.Unversity. Te guiarán a través de la aplicación Weather.
El código fuente de los proyectos (así como el manuscrito para enviar problemas/errores) se encuentra en el repositorio https://github.com/azat-co/react-native-quickly. ¡Disfrútalo!
Por qué React Native es increíble
Las aplicaciones React Native no son lo mismo que las aplicaciones híbridas o llamadas HTML5. Si no está familiarizado con el enfoque híbrido, es cuando hay un sitio web envuelto en un navegador sin cabeza. Un navegador sin cabeza es una vista del navegador sin la barra de direcciones URL ni los botones de navegación. Básicamente, los desarrolladores crean sitios web receptivos utilizando tecnologías web regulares como JavaScript, HTML y CSS, y tal vez un marco como jQuery Mobile, Ionic, Ember o Backbone. Luego lo empaquetan como una aplicación nativa junto con este navegador sin interfaz. Al final, puede reutilizar la misma base de código en todas las plataformas, pero a menudo falta la experiencia de usar aplicaciones híbridas. Por lo general, no son tan rápidos o carecen de ciertas funciones en comparación con las aplicaciones nativas. Entre los marcos más populares para aplicaciones híbridas se encuentran Sencha Touch, Apache Cordova, PhoneGap e Ionic.
Una aplicación React Native, por otro lado, no es un sitio web envuelto en un navegador sin cabeza. Es código nativo de Objective C o Java que se comunica con el JavaScript de React. Esto permite los siguientes beneficios sobre el desarrollo nativo:
- Recarga activa/en vivo. Los desarrolladores pueden volver a cargar sus aplicaciones sin volver a compilarlas, lo que acelera el desarrollo y elimina la necesidad de editores e IDE complejos de Lo que ves es lo que obtienes (WYSIWYG).
- Sistema de diseño Flexbox. Este es un sistema sintetizado para diseños que es similar a CSS y permite el desarrollo multiplataforma.
- Depuración de Chrome. Los desarrolladores pueden usar las ya conocidas DevTools.
- Escribe una vez y haz que funcione en todas las plataformas.
- Transporte desde la web Reaccione fácilmente, por ejemplo, con marcos como ComponentKit.
- Aproveche la gran cantidad de herramientas, utilidades, bibliotecas, conocimientos, prácticas recomendadas, ES6/7+ y libros de código abierto sobre JavaScript (el lenguaje de programación más popular del mundo).
- Use elementos nativos, que son mejores y más potentes que la tecnología web (el enfoque HTML5/envoltorio).
- Reaccionar. Sin enlace de datos específico, gestión de eventos o microgestión de vistas, todo lo cual tiende a aumentar la complejidad. React utiliza un enfoque declarativo y un flujo de datos unidireccional fácil de escalar.
Por estas razones, no sorprende que tanto las empresas grandes como las pequeñas se suban al tren de React Native y abandonen los enfoques híbridos y nativos. Todos los días leo publicaciones de blog que dicen que tal o cual compañía o algún desarrollador de iOS se ha cambiado a React Native, y que están contentos con el cambio. ¿Estás listo para comenzar con lo que parece ser la próxima generación de desarrollo móvil?
Configuración del desarrollo nativo de React
Este capítulo trata solo del desarrollo de React Native para iOS. Usaré solo componentes multiplataforma universales, por ejemplo, Navigator y no NavigatorIOS —así que el código proporcionado también debería funcionar para Android. Sin embargo, no entraré en detalles sobre cómo compilaría los proyectos de Android.
Si no trabaja en el hardware de Apple con Mac OS X, puede instalar una máquina virtual que ejecute Mac OS X en un sistema operativo Linux o Windows siguiendo esta guía. En el futuro, asumo que todos estamos trabajando en Mac OS X, ya sea virtual o no, para crear aplicaciones para iOS.
Para instalar todo, puede hacerlo manualmente o usar un administrador de paquetes. Como estamos trabajando en un entorno Mac OS X, recomiendo usar Homebrew (también conocido como brew) para instalar algunas de las herramientas necesarias. Si aún no tiene Homebrew, puede ir a su sitio web, http://brew.sh, o ejecutar este comando de Ruby (Mac OS X viene con Ruby):
$ ruby -e "$(curl -fsSL https://raw.githubusercontent.com/Homebrew/install/master/install)"
Necesitaremos las siguientes herramientas y bibliotecas:
- Node.js v5.1 y npm v3.3.12:si lee los capítulos 1 a 8, ya debería tenerlos. Si saltaste aquí, sigue las instrucciones del apéndice B.
- Watchman v4.1.0:esta herramienta supervisará y actualizará de acuerdo con los cambios del archivo de código fuente. Usa
$ brew install [email protected]para instalarlo. - Google Chrome:el navegador le permitirá depurar aplicaciones React Native durante el desarrollo. Aquí está el enlace para descargarlo.
- React Native CLI v0.1.7:esta herramienta le permitirá crear repeticiones para sus aplicaciones React Native. Instálelo con
$ npm install -g [email protected]. - Xcode v7.2:IDE, compiladores y SDK para iOS, OS X, tvOS y watchOS. Para instalarlo, haga clic en el enlace en https://developer.apple.com/xcode/download para abrir Mac App Store.
- Flow:un verificador de tipos estáticos para JavaScript. Para instalarlo con Homebrew, ejecuta
$ brew install [email protected].
Recomiendo usar NVM v0.29.0, n, o un administrador de versiones de Node similar. Este paso es opcional pero recomendado porque significa que puede cambiar a Node.js v5.1 incluso si su versión principal es más reciente. Para usar Homebrew, ejecuta $ brew install nvm y sigue las instrucciones.
Su sistema debería estar listo para el desarrollo de aplicaciones iOS. Comencemos con el ejemplo de programación por excelencia, Hello World.
[Nota al margen]
Leer publicaciones de blog es bueno, pero ver cursos en video es aún mejor porque son más atractivos.
Muchos desarrolladores se quejaron de la falta de material de video de calidad asequible en Node. Es una distracción ver videos de YouTube y una locura pagar $ 500 por un curso de video de Node.
Visite Node University, que tiene cursos de video GRATUITOS en Node:node.university.
[Fin de la nota al margen]
Hello World y la CLI de React Native
Primero, navegue a la carpeta donde desea tener su proyecto. El mío es /Usuarios/azat/Documentos/Código/reaccionar/ch9/. Luego ejecuta el $ react-native init comando de terminal para iniciar el proyecto mediante la creación de proyectos de iOS y Android, package.json y otros archivos y carpetas:
$ react-native init hello
Esperar. Puede llevar algo de tiempo. Hay algunas cosas que suceden en este momento. Obviamente, se crea la carpeta hola. Luego, la herramienta crea package.json. (Me encanta cómo Node y npm están en todas partes hoy en día. ¡Este no era el caso en 2012!) En package.json, el react-native CLI, que es global, pone una dependencia local, react-native . Esto es similar a ejecutar $ npm i react-native --save .
Después de ese paso, el react-native global CLI ejecuta el código local desde el hello/node_modules/react-native/local-cli/cli.js archivo, y que a su vez ejecuta el script bash auxiliar hello/node_modules/react-native/init.sh . Ese script bash crea andamios con código React Native en los archivos index.ios.js e index.android.js, así como proyectos iOS y Android en las carpetas ios y android.
En la carpeta ios, la herramienta crea archivos de proyecto Xcode con código Objective C. Ese es nuestro enfoque en este momento. Aquí está la estructura de carpetas estándar creada por la herramienta:
/android
  /app
  /gradle
  - build.gradle
  - gradle.properties
  - gradlew
  - gradlew.bat
  - settings.gradle
/ios
  /hello
  /hello.xcodeproj
  /helloTests
/node_modules
  - ...
- index.android.js
- index.ios.js
- package.json
- .watchman.config
- .flowconfig
Una vez que se haya generado todo, volverá al símbolo del sistema. El resultado en mi computadora fue este, que incluso me dice cómo iniciar las aplicaciones:
To run your app on iOS:
   Open /Users/azat/Documents/Code/react/ch9/hello/ios/hello.xcodeproj in Xcode
   Hit the Run button
To run your app on Android:
   Have an Android emulator running (quickest way to get started), or a device connected
   cd /Users/azat/Documents/Code/react/ch9/hello
   react-native run-android
Tienes dos opciones. Puede abrir Xcode manualmente y seleccionar Abrir (Comando+O) en el menú Archivo, abrir el archivo hello.xcodeproj y hacer clic en el rectángulo negro para compilar y ejecutar. O puede navegar a la carpeta con $ cd hello , ejecute $ open ios/hello.xcodeproj y haga clic en "reproducir" en Xcode para compilar y ejecutar.
Si siguió los pasos correctamente, verá una nueva ventana de terminal que dice React Packager. Comienza con un mensaje:
 ~/Documents/Code/react/ch9/hello/node_modules/react-native/packager ~
 ┌────────────────────────────────────────────────────────────────────────────┐
 │  Running packager on port 8081.                                            │
 │                                                                            │
 │  Keep this packager running while developing on any JS projects. Feel      │
 │  free to close this tab and run your own packager instance if you          │
 │  prefer.                                                                   │
 │                                                                            │
 │  https://github.com/facebook/react-native                                  │
 │                                                                            │
 └────────────────────────────────────────────────────────────────────────────┘
Looking for JS files in
   /Users/azat/Documents/Code/react/ch9/hello

[12:15:42 PM] <START> Building Dependency Graph
[12:15:42 PM] <START> Crawling File System
[12:15:42 PM] <START> Loading bundles layout
[12:15:42 PM] <END>   Loading bundles layout (0ms)
Entonces, ¿Que esta pasando aquí? React Native empaqueta nuestros archivos React Native JavaScript y los sirve en localhost:8081. Así es, es como cualquier otro servidor web si abre su navegador en http://localhost:8081/index.ios.bundle?platform=ios&dev=true. Ábrelo en tu navegador ahora. Busca "hola". Verá el código de React Native agrupado en un archivo grande. Esto debería sonar familiar para la mayoría de los desarrolladores web.;-)
¿Dónde obtuve la http://localhost:8081/index.ios.bundle?platform=ios&dev=true URL? Está en el archivo hello/ios/hello/AppDelegate.m, en la línea 34 (usted está usando la misma versión que yo, ¿verdad?):
jsCodeLocation = [NSURL URLWithString:@"http://localhost:8081/index.ios.bundle?platform=ios&dev=true"];
El código de Objective C toma el JavaScript del servidor. Esa es la opción predeterminada número uno. Hay una segunda opción, que se comenta en este momento. Toma el código JavaScript del archivo estático (línea 42 en el mismo archivo). ¡Es bueno tener opciones!
Los comentarios nos dicen cómo podemos hacer girar el servidor. Es solo el $ npm start comando, que ejecuta $ react-native start , por lo que podemos usar este último también. Entonces, si está cambiando de proyecto o no desea utilizar el proceso de terminal abierto automáticamente por Xcode, siempre puede iniciar un nuevo servidor. Solo tenga en cuenta, como con cualquier servidor, que no puede tener dos de ellos escuchando en el mismo puerto. Por lo tanto, finalice el proceso anterior antes de activar un nuevo servidor en localhost:8081.
Lleva algún tiempo abrir la ventana del Simulador. Prefiero trabajar con iPhone 6, no con iPhone 6 Plus. De esta manera tengo más espacio para el desarrollo en mi pantalla. A estas alturas ya debería tener abierta la ventana del Simulador. Hurgar. No hay mucho que ver, como se muestra en la figura 1.
Continúe y abra el archivo index.io.js. Puede ver el código JavaScript/Node de aspecto familiar. Si todavía no se siente cómodo con ES6 (o ES2015, su nombre oficial), consulte el capítulo 10 y el apéndice I.
Al comienzo del archivo, hay una declaración de desestructuración para importar objetos de React Native:
var React = require('react-native');
var {
  AppRegistry,
  StyleSheet,
  Text,
  View,
} = React;
A continuación, puedes ver a tu buen viejo amigo React.createClass() con el render método:
var hello = React.createClass({
    render: function() {
        return (
            <View style={styles.container}>
                <Text style={styles.welcome}>
                  Welcome to React Native!
                </Text>
                <Text style={styles.instructions}>
                  To get started, edit index.ios.js
                </Text>
                <Text style={styles.instructions}>
                    Press Cmd+R to reload,{'\n'} Cmd+D or shake for dev menu
                </Text>
             </View>
        );
    }
});
Dios mío, con buenos comentarios como este, pronto estaré fuera del negocio, lo que significa que no tendré que escribir libros.;-) Como dicen, presionar Comando+R en el Simulador lo recargará. Continúe y cambie "¡Bienvenido a React Native!" a "¡Hola mundo!" Guarde index.ios.js y vuelva a cargar la aplicación en la ventana del simulador.
Nota:si está usando algún diseño de teclado no estándar como Dvorak o Colemak (como yo), en la ventana del Simulador tendrá que usar el diseño estándar de EE. UU. para los accesos directos y también para escribir texto.
Observe los cambios y observe cómo no tuvimos que reconstruir el proyecto Xcode. Watchman actualizó el paquete después de que guardamos el archivo. El nuevo código se sirvió en el servidor en localhost:8081. Puedes ver el texto "¡Hola mundo!" en el navegador si va a http://localhost:8081/index.ios.bundle?platform=ios&dev=true. Una vez que recargamos el Simulador, ¡el nuevo código estaba allí!
Hay dos cosas más interesantes en index.ios.js (y luego pasaremos a explorar cada componente individualmente):StyleSheet y AppRegistry . No están en React web, así que déjame explicarte.
Estilos y Flexbox
El primero es una forma de crear diseño, estilos y formato en los elementos. Creamos un objeto con StyleSheet.create() . Por ejemplo, estos son nuestros estilos Hello World:
var styles = StyleSheet.create({
  container: {
    flex: 1,
    justifyContent: 'center',
    alignItems: 'center',
    backgroundColor: '#F5FCFF',
  },
  welcome: {
    fontSize: 20,
    textAlign: 'center',
    margin: 10,
  },
  instructions: {
    textAlign: 'center',
    color: '#333333',
    marginBottom: 5,
  },
});
Espero que puedas adivinar el significado de algunas de las propiedades, como backgroundColor y fontSize . Son similares a background-color y font-size en CSS, y ya sabes que React usa camelCase en lugar de guiones. Otras propiedades de estilo, como flex , son específicos de React Native. Esto es lo que significan:
flexjustifyContentalignItemsconocimientos tradicionalesflexDirection
Los números en las propiedades de estilo son puntos, no píxeles. La diferencia es que los puntos pueden significar 1 o más píxeles según la pantalla, por lo que el uso de puntos libera a los desarrolladores de escribir if/else condiciones para varios formatos de pantalla. En particular, en iPhones antiguos como el iPhone 3GS, 1 punto es 1 píxel (1:1). Por otro lado, en los nuevos iPhone con pantalla Retina, como el iPhone 6, 1 punto es un cuadrado de 2×2 píxeles (1:2).
La última declaración del archivo es similar a ReactDOM.render() del desarrollo web React:
AppRegistry.registerComponent('hello', () => hello);
Registra nuestro componente, hello , en el registro. Puede cambiar el nombre en la función de flecha ancha (el segundo argumento) a cualquier otra cosa, pero absténgase de cambiar el primer argumento. Las flechas gruesas de ES6 se tratan en el capítulo 10 y el apéndice I. En este momento, exploremos los componentes de React Native con más detalle.
Componentes principales de la interfaz de usuario nativa de React
Es posible que hayas notado que en el render método usamos etiquetas/elementos especiales como <View> y <Text> en lugar de <div> o <p> . Esos elementos especiales o componentes React Native provienen del react-native biblioteca. Hay un montón de ellos allí, y estoy seguro de que vendrán más pronto. Hay componentes específicos para iOS y Android, así como también componentes sintéticos que funcionan en todas las plataformas. Por lo general, los componentes solo para iOS tienen IOS al final de su nombre (por ejemplo, NavigatorIOS ) mientras que los componentes multiplataforma universales no tienen tales terminaciones (por ejemplo, Navigator ).
Describir todos los componentes de React Native tomaría un libro por sí solo. Además, como dije antes, la comunidad y los propios desarrolladores de Facebook agregan constantemente y sin descanso nuevos componentes y actualizan los existentes. Es mejor consultar la documentación oficial para obtener la lista completa y actualizada de los componentes admitidos. Sin embargo, para poder desarrollar aplicaciones móviles mínimas con React Native, deberá aprender los componentes principales (en mi opinión). Ellos son:
View—Componente de vista básico. Cada renderizado debe tener al menos unViewvacío .Text—Componente de texto. Todo el texto debe estar envuelto en este componente, a diferencia del texto en web React.TextInput:componente de campo de entrada de formulario. Úselo para capturar la entrada del usuario.ScrollView—Vista con contenido desplazable. Úselo cuando su contenido no quepa en una pantalla.ListView—Ver con datos estructurados. Úselo para generar listas o tablas.TouchableHighlight—Componente táctil del usuario. Úselo para capturar eventos táctiles del usuario, similar a las etiquetas de anclaje en el desarrollo web.Switch—Interruptor booleano de encendido/apagado. Úselo para configuraciones y formularios.Navigator—Componente de navegación altamente personalizable. Úselo para navegar entre pantallas e implementar una barra de navegación y/o una barra de navegación de migas de pan.
Se seleccionaron todos estos componentes porque conocerlos le proporcionará lo mínimo para crear aplicaciones algo útiles, como verá en los proyectos de la aplicación Timer y Weather. Además, estos componentes son universales; es decir, puedes (y debes) usarlos para iOS y Android. Tal vez incluso puedas usar la misma base de código para index.ios.js e index.android.js.
Para esta sección del libro, usaré fragmentos de código de los proyectos de la aplicación Timer y Weather para hacer que los ejemplos sean más realistas que solo algunos foo-bars. El código para el temporizador está en timer . El código de Weather App está en weather .
Ver
Como mencioné antes, View es el componente más básico. Si no sabe qué usar, use View . Puede envolver muchos otros componentes en un View , similar a envolverlos en un <div> , porque render() debe devolver solo un único elemento . Por ejemplo, para generar la cantidad de segundos restantes y una etiqueta debajo, envuélvalos en un View :
var Timer = React.createClass({
   render() {
     // ...
     return (
       <View>
         <Text style={styles.heading}>{this.props.time}</Text>
         <Text>Seconds left</Text>
       </View>
     )
    }
})
Texto
El Text componente es para representar texto. Como la mayoría de los otros componentes, podemos suministrarlo con estilos. Por ejemplo, este Text El elemento está usando Flex y tiene un tamaño de fuente de 36, relleno en la parte superior de 40 y un margen de 10:
var TimerWrapper = React.createClass({
  // ...
  render() {
    return (
      <ScrollView>
        <View style={styles.container}>
          <Text style={styles.heading}>Timer</Text>
         ...
        </View>
      </ScrollView>
    )
  }
})

var styles = StyleSheet.create({
  ...
  heading: {
    flex: 1,
    fontSize: 36,
    paddingTop: 40,
    margin: 10
  },
  ...
})
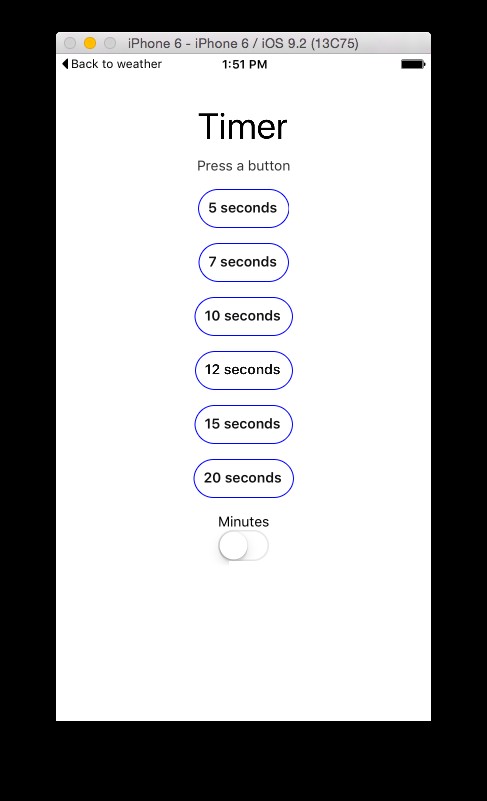
El resultado se muestra en la Figura 1.

Convenientemente, podemos combinar dos o más objetos de estilo en el style propiedad utilizando una matriz. Por ejemplo, este Text elemento usa estilos de navBarText y navBarButtonText :
        <Text style={[styles.navBarText, styles.navBarButtonText, ]}>
          {'<'} {previousRoute.name}
        </Text>
El style El atributo y la combinación de estilos no son exclusivos de Text . Puede aplicarlos a otros componentes.
Entrada de texto
TextInput es un componente de campo de entrada. Por lo general, lo usaría en formularios para capturar la entrada del usuario, como la dirección de correo electrónico, la contraseña, el nombre, etc. Este componente tiene algunas propiedades familiares, como:
placeholder—Texto de ejemplo que se mostrará cuando el valor esté vacíovalue—El valor del campo de entradastyle—Un atributo de estilo
Otros atributos son específicos de React Native. Los principales son:
enablesReturnKeyAutomatically—Sifalse(el valor predeterminado), evita que un usuario envíe un valor de texto vacío al deshabilitar la tecla de retorno.onChange:el método para invocar en el cambio de valor. Pasa el objeto de evento como argumento.onChangeText:el método para invocar en el cambio de valor. Pasa el valor del texto como argumento.onEndEditing—El método para invocar cuando el usuario presiona la tecla de retorno en el teclado virtual.multiline—Sitrue(el valor predeterminado esfalse), el campo puede ocupar varias líneas.keyboardType:uno de los valores del enumerador, como'default','numeric'o'email-address'.returnKeyType:enumerador para la tecla de retorno, como'default','go','google','join','next','route','search','send','yahoo','done'o'emergency-call'. Solo para iOS.
La lista completa de propiedades actualizadas para TextInput para iOS y Android está en https://facebook.github.io/react-native/docs/textinput.html#props.
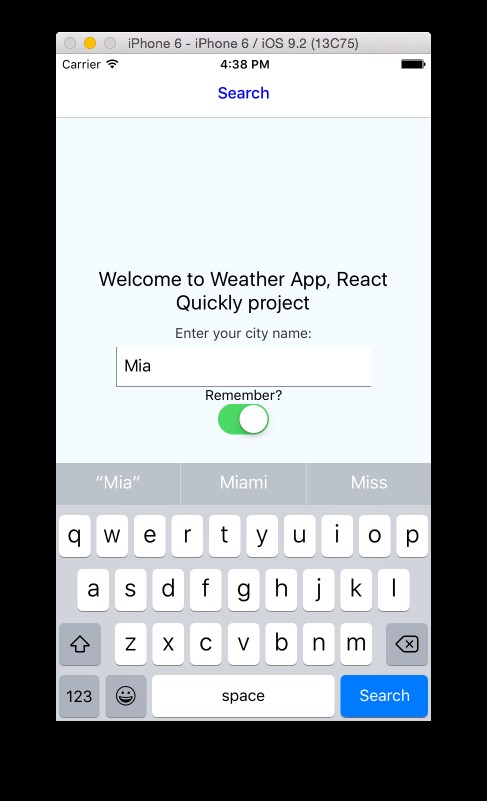
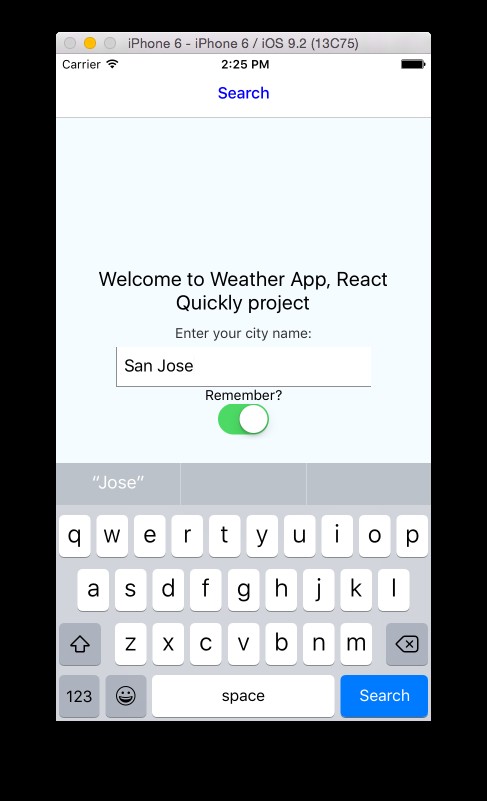
Considere este ejemplo, que representa un campo de entrada de nombre de ciudad con el controlador this.search . El botón del teclado dirá Buscar, el valor se asigna al estado (¡un componente controlado!) y el marcador de posición es San Francisco:
  <TextInput
    placeholder="San Francisco"
    value={this.state.cityName}
    returnKeyType="search"
    enablesReturnKeyAutomatically={true}
    onChangeText={this.handleCityName}
    onEndEditing={this.search}
    style={styles.textInput}/>
El resultado se muestra en la Figura 2, donde puede observar la tecla Buscar en el teclado virtual.
Con el onChangeText propiedad, obtenemos el valor del campo de entrada como argumento para la función del controlador (handleCityName(event) ). Por ejemplo, para procesar el nombre de la ciudad y establecer el estado de cityName en un componente controlado, necesitamos implementar handleCityName así:
  ...
  handleCityName(cityName) {
    this.setState({ cityName: cityName})
  },
  ...
Por otro lado, si necesita más que texto, hay onChange . Cuando el evento llega al onChange función de controlador, el event argumento tiene una propiedad llamada nativeEvent , y esta propiedad a su vez tiene una propiedad llamada text . Puede implementar el onChange controlador como este:
...
onNameChanged: function(event) {
  this.setState({ name: event.nativeEvent.text });
},
...
render() {
  return (
    <TextInput onChange={this.onNameChange} ... />
  )
}
})
Vista de desplazamiento
Esta es una versión mejorada del View componente. Permite que el contenido sea desplazable, por lo que puede desplazarse hacia arriba y hacia abajo con gestos táctiles. Esto es útil cuando el contenido no cabe en una pantalla. Por ejemplo, puedo usar ScrollView como raíz de mi render() porque sé que timerOptions puede ser una matriz muy grande, por lo que representa muchas filas de datos (Button componentes):
var TimerWrapper = React.createClass({
  // ...
  render() {
    return (
      <ScrollView>
        <View style={styles.container}>
          <Text style={styles.heading}>Timer</Text>
          <Text style={styles.instructions}>Press a button</Text>
          <View style={styles.buttons}>
            {timerOptions.map((item, index, list)=>{
              return <Button key={index} time={item} startTimer={this.startTimer} isMinutes={this.state.isMinutes}/>
            })}
          </View>
          ...
        </View>
      </ScrollView>
    )
  }
})
Vista de lista
ListView es una vista que representa una lista de filas a partir de los datos proporcionados. En la mayoría de los casos, desea envolver un ListView en un ScrollView . Los datos deben estar en un formato determinado. Utilice dataSource = new ListView.DataSource() para crear el objeto de fuente de datos, luego use dataSource.cloneWithRows(list) para llenar la fuente de datos con datos de una matriz de JavaScript estándar.
Aquí hay un ejemplo. Primero creamos el objeto fuente de datos:
let dataSource = new ListView.DataSource({
  rowHasChanged: (row1, row2) => row1 !== row2
})
Luego usamos el cloneWithRows método para completar los datos de una matriz, response.list :
this.props.navigator.push({
  name: 'Forecast',
  component: Forecast,
  passProps: {
    forecastData: dataSource.cloneWithRows(response.list),
    forecastRaw: response
  }
})
Ignora el navigator llamar por ahora. Aparecerá más adelante en el capítulo.
Tenemos los datos, así que ahora representemos el ListView proporcionando las propiedades dataSource y renderRow . Por ejemplo, esta es la lista de información de pronóstico, en la que cada fila es un pronóstico para un día determinado. El ListView El padre de es ScrollView :
module.exports = React.createClass({
  render: function() {
    return (
      <ScrollView style={styles.scroll}>
        <Text style={styles.text}>{this.props.forecastRaw.city.name}</Text>
        <ListView dataSource={this.props.forecastData} renderRow={ForecastRow} style={styles.listView}/>
      </ScrollView>
    )
  }
})
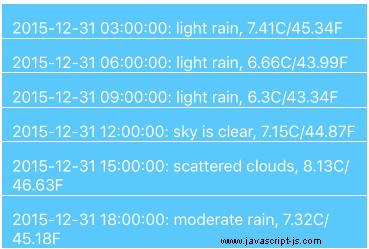
Como puedes adivinar, renderRow , que es ForecastRow en este ejemplo, hay otro componente que es responsable de representar un elemento individual desde la fuente de datos proporcionada. Si no hay métodos o estados, puede crear un componente sin estado (más información sobre los componentes sin estado en el capítulo 10). En el ForecastRow , mostramos la fecha (dt_txt ), descripción (description ), y temperatura (temp ):
const ForecastRow = (forecast)=> {
  return (
    <View style={styles.row}>
      <View style={styles.rightContainer}>
        <Text style={styles.subtitle}></Text>
        <Text style={styles.subtitle}>
          {forecast.dt_txt}: {forecast.weather[0].description}, {forecast.main.temp}
        </Text>
       </View>
    </View>
  )
}
Puede lograr la funcionalidad de ListView con un simple Array.map() construir. En este caso, no hay necesidad de una fuente de datos.
Destacados táctiles
TouchableHighlight captura los eventos táctiles del usuario. Los desarrolladores implementan botones similares al ancla (<a> ) etiquetas en el desarrollo web. La acción se pasa como el valor de onPress propiedad. Para implementar un botón, también necesitamos poner algo de texto dentro de él.
Por ejemplo, este es un botón que activa startTimer y tiene texto que consiste en el time propiedad y la palabra "minutos" o "segundos":
var Button = React.createClass({
  startTimer(event) {
    // ...
  },
  render() {
    return (
      <TouchableHighlight onPress={this.startTimer}>
        <Text style={styles.button}>{this.props.time} {(this.props.isMinutes) ? 'minutes' : 'seconds'}</Text>
      </TouchableHighlight>
    )
  }
})
El estilo de TouchableHighlight por sí mismo no es nada; por esta razón, cuando implementamos botones, diseñamos el texto dentro del TouchableHighlight (Figura 3) o usa una imagen con el Image componente.

Componentes similares a TouchableHighlight son:
TouchableNativeFeedbackTouchableOpacityTouchableWithoutFeedback
Interruptor
Probablemente hayas visto y usado el Switch componente o un elemento nativo similar muchas veces. En la Figura 9-X se muestra un ejemplo visual. Es una pequeña palanca que no es diferente a una casilla de verificación. Este es un elemento de entrada booleano activado/desactivado que resulta útil en formularios y configuraciones de aplicaciones.

Al implementar Switch , proporciona al menos dos propiedades, onValueChange y value (¡un componente controlado de nuevo!). Por ejemplo, esta opción hace que las aplicaciones guarden o no el nombre de la ciudad:
      ...
        <Text>Remember?</Text>
        <Switch onValueChange={this.toggleRemember} value={this.state.isRemember}></Switch>
      ....
En el controlador toggleRemember , configuro el estado en el valor opuesto al actual this.state.isRemember :
  // ...
  toggleRemember() {
    this.setState({ isRemember: !this.state.isRemember}, ()=>{
      // Remove the city name from the storage
      if (!this.state.isRemember) this.props.storage.removeItem('cityName')
    })
  },
  // ...
Navegador
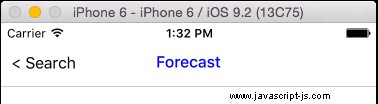
Navigator es un componente de navegación altamente personalizable para permitir la navegación entre pantallas en la aplicación. Podemos usarlo para implementar una barra de navegación y/o una barra de navegación de migas de pan. Una barra de navegación es un menú en la parte superior de la pantalla con botones y un título.
También hay NavigatorIOS , que no es utilizado por Facebook y, por lo tanto, no es compatible ni mantenido oficialmente por la comunidad. NavigatorIOS tiene una barra de navegación incorporada, pero solo funciona para el desarrollo de iOS. Otro inconveniente es que NavigatorIOS no actualizará las rutas/pantallas cuando cambien las propiedades de esas rutas. Por el contrario, Navigator se puede usar en iOS y Android, y actualiza las rutas al cambiar las propiedades que se les pasan. Puede personalizar las barras de navegación a su gusto.
Porque Navigator es flexible, encontré algunas formas de implementarlo. Hay un método en el que tiene una pila de rutas y luego navega usando ID de ruta y métodos de avance/retroceso. Me decidí por este patrón, que utiliza la abstracción y el NavigatorIOS interfaz (passProps ). Digamos el App componente es el que registras con AppRegistry . Entonces quieres renderizar el Navigator en App render método:
const App = React.createClass({
  render() {
    return (
      <Navigator
        initialRoute={{
          name: 'Search',
          index: 0,
          component: Search,
          passProps: {
            storage: storage
          }
        }}
        ref='navigator'
        navigationBar={
          <Navigator.NavigationBar
            routeMapper={NavigationBarRouteMapper}
            style={styles.navBar}
          />
        }
        renderScene={(route, navigator) => {
          let props = route.passProps
          props.navigator = navigator
          props.name = route.name
          return React.createElement(route.component, props)
        }}
      />
    )
  }
})
Puedes observar varios atributos de Navigator :
initialRoute—El primerísimorouteobjeto que renderizamos.ref—La propiedad delAppelemento que tendrá elNavigatorobjeto. Podemos usarlo para saltar a nuevas escenas.navigationBar—El menú superior con título y botones izquierdo y derecho.renderScene:el método que se activa en el evento de navegación para cada ruta. Obtenemos elrouteobjeto y renderice el componente usandoroute.componentyroute.passProps.
Para navegar a una nueva pantalla como Pronóstico (Forecast componente) y pasarle propiedades, invocar navigator.push() :
        // ...
        this.props.navigator.push({
          name: 'Forecast',
          component: Forecast,
          passProps: {
            forecastData: dataSource.cloneWithRows(response.list),
            forecastRaw: response
          }
        })
        // ...
En este ejemplo, paso el componente y los accesorios con cada push() llamar. Si está utilizando una pila de rutas, que es básicamente una lista de componentes, puede pasar solo una ID o el nombre de un componente, no el objeto completo, y obtener el objeto de la pila. Como de costumbre, hay más de una forma de despellejar un bagre.
Importación de módulos al proyecto Xcode
¿Qué sucede si desea utilizar un componente React Native de la comunidad, es decir, algo que no forma parte de react-native? , pero se proporciona como un módulo npm independiente? ¡Puedes importar un módulo a tu proyecto!
En Timer, necesitamos reproducir el sonido cuando se acabe el tiempo. No hay un componente oficial para los sonidos a partir de este escrito (enero de 2016), pero hay varios módulos de espacio de usuario. Uno de ellos es react-native-audioplayer . Primero, instálelo con npm en la carpeta del proyecto:
$ npm install [email protected] --save
Nos estamos centrando en iOS en este momento, por lo que la instalación es la siguiente:
- Abre tu proyecto en Xcode.
- En Xcode, busque el Navegador de proyectos en la barra lateral izquierda.
- En el Navegador de proyectos, haga clic con el botón derecho en Bibliotecas.
- En el menú contextual, haga clic en Agregar archivos al "temporizador". (Sustituya otro nombre de proyecto por "temporizador" si es necesario).
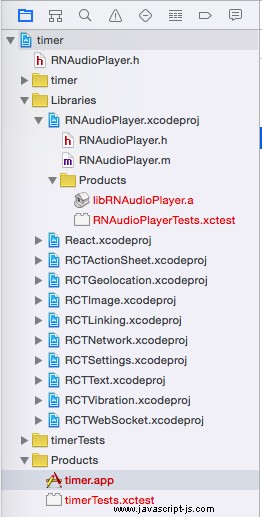
- Navegar a
node_modules/react-native-audioplayer. Agrega el archivoRNAudioPlayer.xcodeproj. El resultado se muestra en la Figura 5.
- En el Navegador de proyectos, seleccione su proyecto (temporizador).
- Haga clic en el objetivo de compilación para el temporizador en la lista de objetivos (figura 9-X).
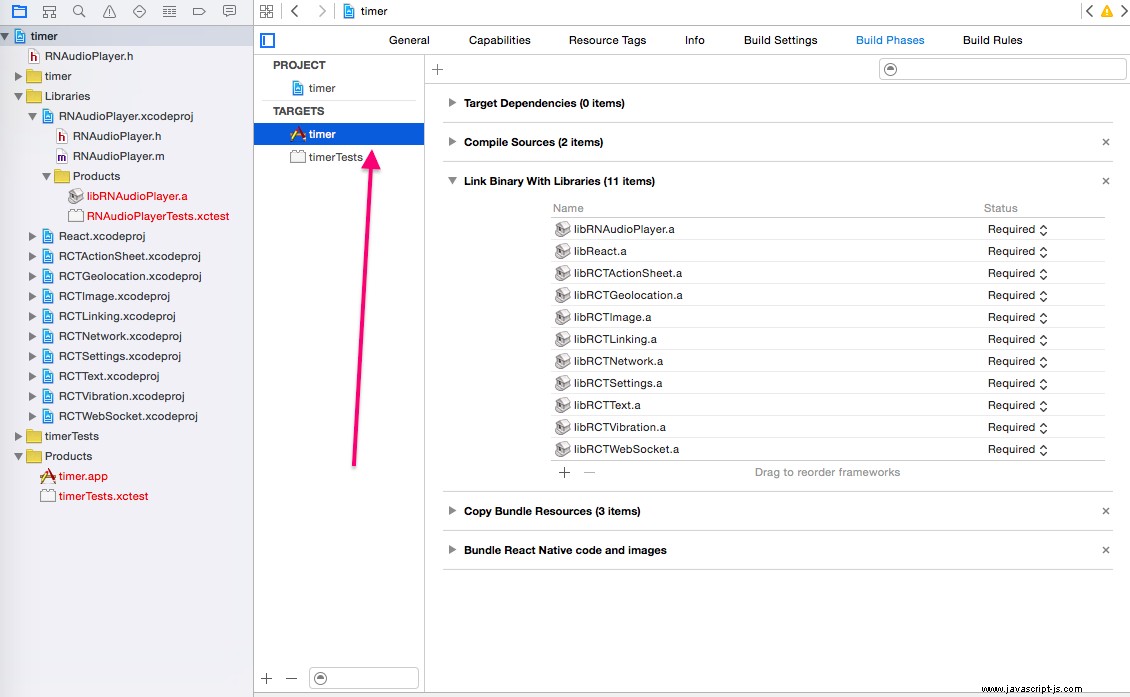
- Haga clic en la pestaña Fases de construcción para abrirla.
- Expandir enlace binario con bibliotecas haciendo clic en él.
- Haga clic en el botón más (+) y agregue libRNAudioPlayer.a en Workspace, o simplemente arrastre y suelte libRNAudioPlayer.a desde Project Navigator. Está bajo
Libraries/RNAudioPlayer.xcodeproj/Products. - Ejecute su proyecto (presione Comando+R o haga clic en el rectángulo negro que significa "reproducir").
Si hiciste todo correctamente, en el archivo index.ios.js, puedes importar el módulo con require() :
AudioPlayer = require('react-native-audioplayer')
Y reproduce el sonido con play() :
AudioPlayer.play('flute_c_long_01.wav')
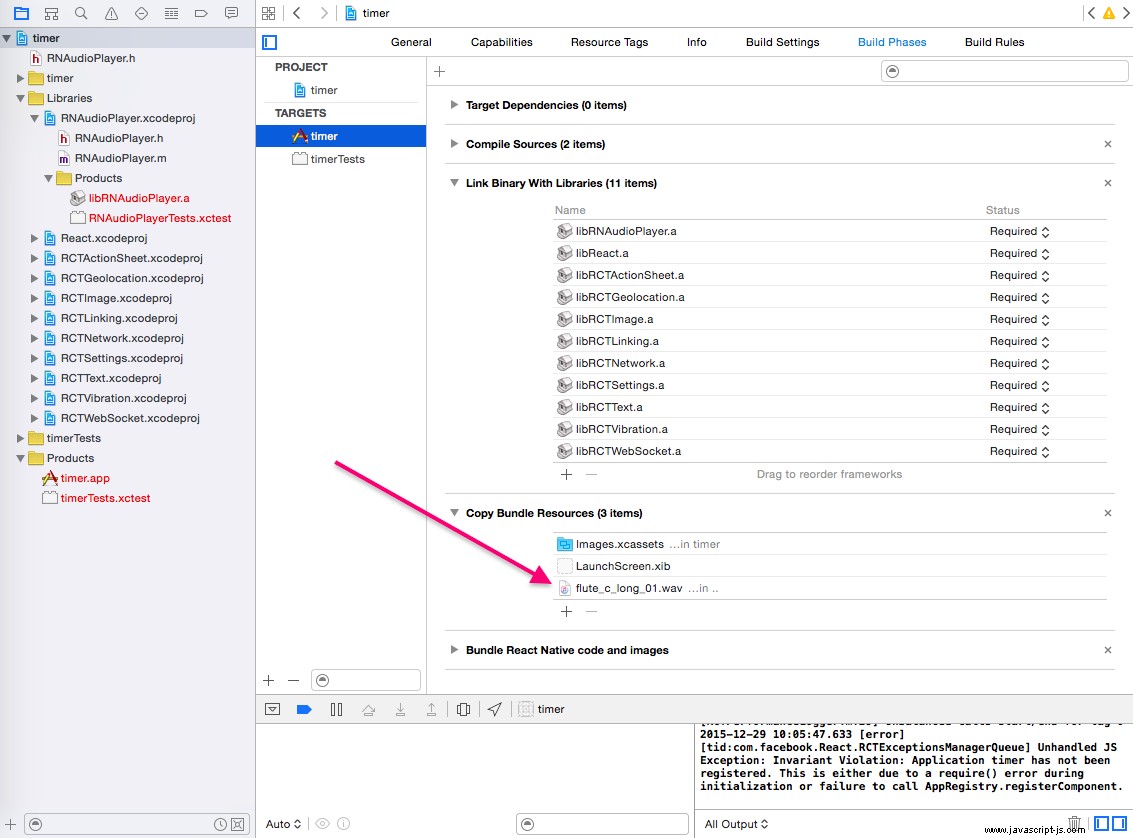
El archivo de sonido debe incluirse en el paquete. Para hacerlo, seleccione Copiar recursos del paquete y agregue flute_c_long_01.wav , o su propio archivo de sonido como se muestra en la Figura 7.
Esa es toda la preparación. ¡Ahora podemos implementar Timer!
Proyecto:Temporizador
Has visto fragmentos de la aplicación Timer (Figura 8), que está en timer . Creo que será beneficioso si pasamos por la implementación de inmediato. El archivo principal es index.ios.js . Tiene tres componentes, similares a mi navegador/web React Timer de React Quickly (Manning, 2016), (GitHub):
TimerWrapper—Un componente inteligente que tiene la mayor parte de la lógica del temporizadorTimer—Un componente tonto que reproduce el sonido cuando se acaba el tiempo y muestra la cantidad de segundos restantesButton:un componente que muestra un botón y desencadena el inicio de la cuenta regresiva al invocar el controlador que le pasó el padre (TimerWrapper)
Comenzamos el archivo index.ios.js con importaciones de React Native, sus objetos y Audio Player:
'use strict'

var React = require('react-native'),
  AudioPlayer = require('react-native-audioplayer')

var {
  AppRegistry,
  StyleSheet,
  Text,
  View,
  ScrollView,
  TouchableOpacity,
  Switch
} = React
La siguiente declaración declara la matriz de opciones para los botones del temporizador, que convertiremos en número de segundos o número de minutos usando Switch :
const timerOptions = [5, 7, 10, 12, 15, 20]
Mejoré TimerWrapper del proyecto del capítulo 5 con la generación dinámica de botones y el cambio de segundos a minutos. El interruptor está usando el isMinutes estado, así que vamos a establecerlo en false al principio. Solo para recordarle, este ejemplo usa alguna sintaxis ES6+/ES2015+. Si no está familiarizado con él o no está seguro de si lo está, consulte el capítulo 10 y el apéndice I.
var TimerWrapper = React.createClass({
  getInitialState () {
    return {time: null, int: null, isMinutes: false}
  },
El valor inicial de isMinutes es false . toggleTime es el controlador para el Switch . Volteamos el valor de isMinutes con el no lógico (! ). Es importante establecer la hora en null , de lo contrario, el sonido se activará cada vez que presionemos el interruptor. La reproducción de sonido está condicionada a time siendo 0 , por lo que si lo configuramos en null , no se reproducirá. La lógica del sonido está en el Timer componente. El algoritmo React decide volver a renderizarlo cuando cambiamos el estado de isMinutes :
  toggleTime(){
    let time = this.state.time
    if (time == 0 ) time = null
    this.setState({isMinutes: !this.state.isMinutes, time: time})
  },
El siguiente método inicia los temporizadores. Si siguió el proyecto del capítulo 5, sabrá cómo funciona. React Native proporciona una API para temporizadores, es decir, clearInterval() y setInterval() como objetos globales. El número en el time el estado siempre es en segundos, incluso si vemos minutos en los botones y el interruptor está encendido:
  startTimer(time) {
    clearInterval(this.state.int)
    var _this= this
    var int = setInterval(function() {
      console.log('2: Inside of setInterval')
      var tl = _this.state.time - 1
      if (tl == 0) clearInterval(int)
      _this.setState({time: tl})
    }, 1000)
    console.log('1: After setInterval')
    return this.setState({time: time, int: int})
  },
En el render método, estamos usando un simple map() iterador para generar una columna de botones. Está envuelto en un ScrollView , por lo que realmente puedes volverte loco con el timerOptions matriz agregando más elementos, y vea lo que ha sucedido:
  render() {
    return (
      <ScrollView>
        <View style={styles.container}>
          <Text style={styles.heading}>Timer</Text>
          <Text style={styles.instructions}>Press a button</Text>
          <View style={styles.buttons}>
            {timerOptions.map((item, index, list)=>{
              return <Button key={index} time={item} startTimer={this.startTimer} isMinutes={this.state.isMinutes}/>
            })}
          </View>
Después de los botones, tenemos una etiqueta de texto que dice Minutos y el Switch componente controlado:
          <Text>Minutes</Text>
          <Switch onValueChange={this.toggleTime} value={this.state.isMinutes}></Switch>
          <Timer time={this.state.time}/>
        </View>
      </ScrollView>
    )
  }
})
Los botones que renderizamos en TimerWrapper provienen de este componente. Tiene una condición ternaria (también conocida como el operador Elvis) para establecer minutos, multiplicándolos por 60 (60 segundos en un minuto), o segundos:
var Button = React.createClass({
  startTimer(event) {
    let time = (this.props.isMinutes) ? this.props.time*60 : this.props.time
    return this.props.startTimer(time)
  },
Al renderizar, usamos TouchableOpacity , que es funcionalmente similar a TouchableHighlight pero difiere en la representación visual (es transparente cuando se toca). There is a ternary condition to output the word “minutes” or “seconds” based on the value of the isMinutes property:
  render() {
    return (
      <TouchableOpacity onPress={this.startTimer}>
        <Text style={styles.button}>{this.props.time} {(this.props.isMinutes) ? 'minutes' : 'seconds'}</Text>
      </TouchableOpacity>
    )
  }
})
The Timer component renders the number of seconds left as well as playing the sound when this number is 0 :
var Timer = React.createClass({
   render() {
     if (this.props.time == 0) {
      AudioPlayer.play('flute_c_long_01.wav')
     }
     if (this.props.time == null || this.props.time == 0) return <View><Text  style={styles.heading}> </Text></View>
     return (
       <View>
         <Text style={styles.heading}>{this.props.time}</Text>
         <Text>Seconds left</Text>
       </View>
     )
    }
})
The styles object uses Flex. In container , there’s flexDirection , set to column . It positions elements vertically, as in a column. Another value is row , which will position them horizontally.
var styles = StyleSheet.create({
  container: {
    flex: 1,
    flexDirection: 'column',
    alignItems: 'center'
  },
  heading: {
    flex: 1,
    fontSize: 36,
    paddingTop: 40,
    margin: 10
  },
  instructions: {
    color: '#333333',
    marginBottom: 15,
  },
  button: {
    color: '#111',
    marginBottom: 15,
    borderWidth: 1,
    borderColor: 'blue',
    padding: 10,
    borderRadius: 20,
    fontWeight: '600'
  },
  buttons: {
    flex: 1,
    alignItems: 'center',
    justifyContent: 'flex-start'
  }
})
Lastly, there is the register statement:
AppRegistry.registerComponent('timer', () => TimerWrapper)
Now, we can install and import the Audio Player into the Xcode project following the steps in the previous section. Don’t forget to include the sound file as well. When you’re done, navigate to the ch9/timer folder and start the local server with $ react-native start . You should see:
React packager ready.
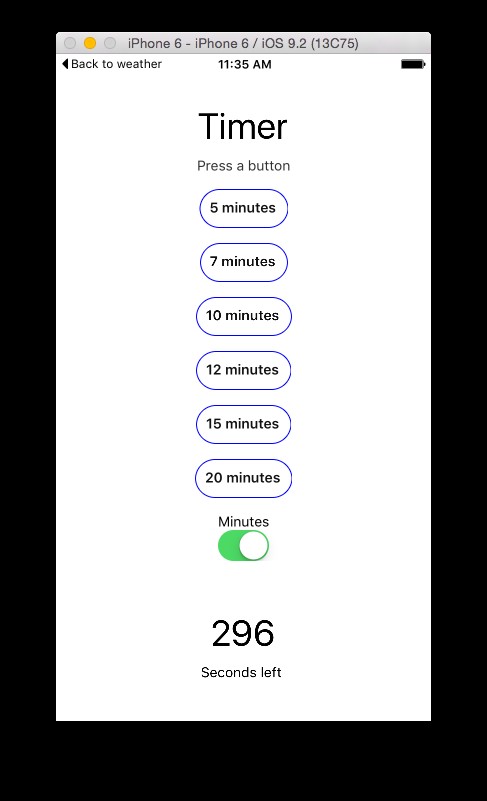
Go to your Simulator and refresh it. You should see buttons with seconds on them and the switch in the off position. Turn it on to use minutes and the buttons will change. Pressing on 5 minutes will start the countdown showing seconds left, as shown in Figure 9.
I dare you to redesign this little app (make it prettier!), publish it to the App Store, and send me the link. Maybe you can get to the top charts. Flappy Bird did.
Project:Weather App
The idea of this project is to fetch weather forecasts from the OpenWeatherMap API based on the city name provided by the user (Figure 10). In this project we’ll be utilizing Navigator to switch between the screens and show a navigation menu on top with a button to go back.
Also, there will be a “remember me” feature to save the entered city name for future uses. The persistence will be implemented with AsyncStorage .
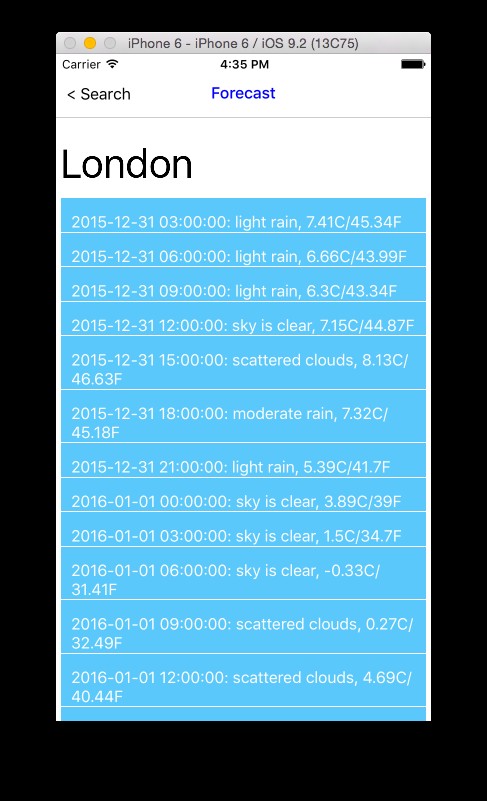
The resulting forecast data will be shown in a grid with the date, description, and temperature in F and C, as shown in Figure 11.
To get started, use the scaffolding provided by the React Native CLI tool (if you don’t have v0.1.7, follow the instructions at the beginning of this chapter to get it):
$ react-native init weather
The command will output something like this:
This will walk you through creating a new React Native project in /Users/azat/Documents/Code/react/ch9/weather
Installing react-native package from npm...
Setting up new React Native app in /Users/azat/Documents/Code/react/ch9/weather
To run your app on iOS:
   Open /Users/azat/Documents/Code/react/ch9/weather/ios/weather.xcodeproj in Xcode
   Hit the Run button
To run your app on Android:
   Have an Android emulator running (quickest way to get started), or a device connected
   cd /Users/azat/Documents/Code/react/ch9/weather
   react-native run-android
Open the iOS project in Xcode with this command:
$ open ios/weather.xcodeproj
In addition to the already existing index.ios.js , create four files, forecast.ios.js , search.ios.js , weather-api.js , and response.json , so the project structure looks like this:
/weather
  /android
    ...
  /ios
    /weather
      /Base.Iproj
        ...
      /Images.xcassets
        ...
      - AppDelegate.h
      - AppDelegate.m
      - Info.plist
      - main.m
    /weather.xcodeproj
      /project.xcworkspace
        ...
      /xcshareddata
        ...
      /xcuserdata
        ...
      - project.pbxproj
    /weatherTests
      - Info.plist
      - weatherTests.m
  /node_modules
    ...
  - .flowconfig
  - .gitignore
  - .watchmanconfig
  - forecast.ios.js
  - index.android.js
  - index.ios.js
  - package.json
  - response.json
  - search.ios.js
  - weather-api.json
The files search.ios.js and forecast.ios.js will be the components for the first screen, which will have the input field for the city name, and the second screen, which will show the forecast, respectively. But before we start implementing Search and Forecast , let’s code the App component and the navigation that will enable us to switch between the Search and Forecast screens.
In the index.ios.js file, add the React Native classes shown in the following listing. The only classes that should be unfamiliar to you by now are AsyncStorage and PixelRatio —everything else was covered earlier in this chapter:
'use strict'

var React = require('react-native')

var {
  AppRegistry,
  StyleSheet,
  Text,
  View,
  Navigator,
  ListView,
  AsyncStorage,
  TouchableOpacity,
  PixelRatio
} = React
Import Search . The const is an ES6 thing. You can use var or learn about const and let in ES6/ES2016 cheatsheet.
const Search = require('./search.ios.js')
Now let’s create an abstraction for the storage, i.e., AsyncStorage . You can use AsyncStorage directly, but it’s better to have an abstraction like the one shown here. The AsyncStorage interface is very straightforward. It uses the getItem() , removeItem() , and setItem() métodos. I’m sure you can guess what they mean. The only interesting part is that for getItem() we need to utilize Promise . The idea behind it is that getItem() results are asynchronous. There’s more on ES6 promises in the cheatsheet.
const storage = {
  getFromStorage(name, callback) {
    AsyncStorage.getItem(name).then((value) => {
      console.log(`AsyncStorage GET for ${name}: "${value}"`)
      if (value) callback(value)
      else callback(null)
    }).done()
  },
  setInStorage(name, value) {
    console.log(`AsyncStorage SET for ${name}: "${value}"`)
    AsyncStorage.setItem(name, value)
  },
  removeItem: AsyncStorage.removeItem
}
Remove the boilerplate component and replace it with App :
const App = React.createClass({
  render() {
    return (
The App component needs to render Navigator . We provide the Search component as the initial route:
      <Navigator
        initialRoute={{
          name: 'Search',
          index: 0,
          component: Search,
          passProps: {
            storage: storage
          }
        }}
The ref property is how we can access the Navigator instance in the App component itself. The navigator object will be in this.refs.navigator , assuming this refers to App :
ref='navigator'
The navigation bar is the menu at the top of the screen, and we render it by using the Navigator.NavigationBar component and supplying the routeMapper property (we still need to implement this):
        navigationBar={
          <Navigator.NavigationBar
            routeMapper={NavigationBarRouteMapper}
            style={styles.navBar}
          />
        }
While the navigation bar is a nice-to-have but not necessary feature, the next property is important.
It basically renders every route. In this example, I assume that the route argument has everything I need, such as components and properties. Another way to implement Navigator is to pass only IDs in route and resolve the component object from the ID by using some hash table (i.e., a route stack object).
        renderScene={(route, navigator) => {
          let props = route.passProps
You can control where the navigator object is in children by setting it to whatever property you want to use. I keep it consistent; the navigator object is placed under this.props.navigator :
          props.navigator = navigator
          props.name = route.name
After we’ve added navigator and name , the props object is ready for rendering:
return React.createElement(route.component, props)
And then, let’s close all the parentheses and tags:
        }}
      />
    )
  }
})
We are done with most of the heavy lifting. If you opted not to implement the navigation bar, you can skip NavigationBarRouteMapper . If you want to use the bar, this is how you can implement it.
The route mapper must have certain methods:LeftButton , RightButton , and Title . This pattern was inspired by the official React navigation bar example. The first method checks whether this is the initial route or not with the index == 0 condición. Alternatively, we can check for the name of the scene, such as name == 'Search' .
var NavigationBarRouteMapper = {
  LeftButton(route, navigator, index, navState) {
    if (index == 0) return null
If we pass the first statement, we are on the Forecast. Set the previous route (Search):
var previousRoute = navState.routeStack[index - 1]
Now, return the button, which is a TouchableOpacity component with Text en eso. I use angle brackets with the previous route’s name as the button label, as shown in Figure 12. You can use Next or something else. This Navigator component is highly customizable. Most likely, you’d have some nicely designed images as well.
    return (
      <TouchableOpacity
The event handler uses the pop() método. Similar to Array.pop() , it removes the last element from a stack/array. The last element is the current screen, so we revert back to the previous route:
        onPress={() => navigator.pop()}
        style={styles.navBarLeftButton}>
        <Text style={[styles.navBarText, styles.navBarButtonText ]}>
          {'<'} {previousRoute.name}
        </Text>
      </TouchableOpacity>
    )
  },
We don’t need the right button in this project, but if you need it, you can implement it analogously to the left button. You might want to use a list of routes, such that you know which one is the next one based on the index of the current route.
  RightButton(route, navigator, index, navState) {
    return (
      <View/>
    )
  },
The last method is straightforward. We render the name of the route as the title. You can use the title property instead of name if you wish; just don’t forget to update it everywhere (that is, in initialRoute , renderScene , and push() in Search ).
  Title(route, navigator, index, navState) {
    return (
      <Text style={[styles.navBarText, styles.navBarTitleText]}>
        {route.name}
      </Text>
    )
  }
}
Lastly, the styles! They are easy to read. One new addition is PixelRatio . It will give us the ratio of pixels so we can control the values on a lower level:
var styles = StyleSheet.create({
  navBar: {
    backgroundColor: 'white',
    borderBottomWidth: 1 / PixelRatio.get(),
    borderBottomColor: '#CDCDCD'
  },
  navBarText: {
    fontSize: 16,
    marginVertical: 10,
  },
  navBarTitleText: {
    color: 'blue',
    fontWeight: '500',
    marginVertical: 9,
  },
  navBarLeftButton: {
    paddingLeft: 10,
  },
  navBarRightButton: {
    paddingRight: 10,
  },
  navBarButtonText: {
    color: 'black'
  }
})
Change the weather component to App in the register call:
AppRegistry.registerComponent('weather', () => App)
We are done with one file, and we have two more to go. Moving in the logical sequence of the app flow, we continue with search.ios.js by importing the objects:
'use strict'

var React = require('react-native')
const Forecast = require('./forecast.ios')

var {
  StyleSheet,
  Text,
  TextInput,
  View,
  Switch,
  TouchableHighlight,
  ListView,
  Alert
} = React
Next, we want to declare the OpenWeatherMap API key, which you can get from their website after registering as a developer. Pick the free plan unless you’re sure your app will hit the limits when it becomes number one on iTunes (or is it the App Store?). Refrain from using my keys, and get your own:
const openWeatherAppId = '2de143494c0b295cca9337e1e96b00e0',
  // This is Azat's key. Get your own!
In the event that OpenWeatherMap changes the response format or if you want to develop offline (as I do), keep the real URL commented and use the local version (weather-api.js Node.js server):
  // openWeatherUrl = 'http://api.openweathermap.org/data/2.5/forecast' // Real API
  openWeatherUrl = 'http://localhost:3000/' // Mock API, start with $ node weather-api
Because this file is imported by index.ios.js , we need to export the needed component. You can create another variable/object, but I just assign the component to module.exports for eloquence:
module.exports = React.createClass({
  getInitialState() {
When we get the initial state, we want to check if the city name was saved. If it was, then we’ll use that name and set isRemember to true , because the city name was remembered in the previous use:
    this.props.storage.getFromStorage('cityName', (cityName) => {
      if (cityName) this.setState({cityName: cityName, isRemember: true})
    })
While we wait for the asynchronous callback with the city name to be executed by the storage API, we set the value to none:
    return ({isRemember: false, cityName: ''})
  },
Next, we handle the switch by setting the state of isRemember , because it’s a controlled component:
  toggleRemember() {
    console.log('toggle: ', this.state.isRemember)
    this.setState({ isRemember: !this.state.isRemember}, ()=>{
If you remember from previous chapters (I know, it was so long ago!), setState() is actually asynchronous. We want to remove the city name if the Remember? toggle is off, so we need to implement removeItem() in the callback of setState() , and not just on the next line (we might have a race condition and the state will be old if we don’t use a callback):
      if (!this.state.isRemember) this.props.storage.removeItem('cityName')
    })
  },
On every change of the city name TextInput , we update the state. This is the handler for onChangeText , so we get the value as an argument, not the event:
  handleCityName(cityName) {
    this.setState({ cityName: cityName})
  },
The search() method is triggered by the Search button and the virtual keyboard’s “enter.” First, we define the states as local variables to eliminate unnecessary typing:
  search(event) {
    let cityName = this.state.cityName,
      isRemember = this.state.isRemember
It’s good to check that the city name is not empty. There’s a cross-platform component Alert for that:
    if (!cityName) return Alert.alert('No City Name',
      'Please enter city name',
      [{text: 'OK', onPress: () => console.log('OK Pressed!')}]
    )
The most interesting piece of logic in the entire app is how we make the external call. The answer is easy. We’ll use the new fetch API, which is already part of Chrome. We don’t care about Chrome right now too much; all we need to know is that React Native supports it. In this example, I resorted to the ES6 string interpolation (a.k.a. string template) to construct the URL. If you’re using the local server, the response will be the same (response.json ), so the URL doesn’t matter.
    fetch(`${openWeatherUrl}/?appid=${openWeatherAppId}&q=${cityName}&units=metric`, {
      method: 'GET'
    }).then((response) => response.json())
      .then((response) => {
Once we get the data, we want to store the city name. Maybe you want to do it before making the fetch call. It’s up to you.
if (isRemember) this.props.storage.setInStorage('cityName', cityName)
The ListView will render the grid, but it needs a special object data source. Create it like this:
        let dataSource = new ListView.DataSource({
          rowHasChanged: (row1, row2) => row1 !== row2
        })
Everything is ready to render the forecast. Use the Navigator object by invoking push() and passing all the necessary properties:
        this.props.navigator.push({
          name: 'Forecast',
          component: Forecast,
passProps is an arbitrary name. I followed the NavigatorIOS syntax here. You can pick another name. For the ListView , we populate the rows from the JavaScript/Node array with cloneWithRows() :
          passProps: {
            forecastData: dataSource.cloneWithRows(response.list),
            forecastRaw: response
          }
        })
      })
      .catch((error) => {
        console.warn(error)
      })
  },
We are done with the methods of Search . Now we can render the elements:
  render: function() {
    return (
      <View style={styles.container}>
        <Text style={styles.welcome}>
          Welcome to Weather App, React Quickly project
        </Text>
        <Text style={styles.instructions}>
          Enter your city name:
        </Text>
The next element is a TextInput for the city name. It has two callbacks, onChangeText , which triggers handleCityName , and onEndEditing , which calls search :
        <TextInput
          placeholder="San Francisco"
          value={this.state.cityName}
          returnKeyType="search"
          enablesReturnKeyAutomatically={true}
          onChangeText={this.handleCityName}
          onEndEditing={this.search} style={styles.textInput}/>
The last few elements are the label for the switch, the switch itself, and the Search button:
        <Text>Remember?</Text>
        <Switch onValueChange={this.toggleRemember} value={this.state.isRemember}></Switch>
        <TouchableHighlight onPress={this.search}>
          <Text style={styles.button}>Search</Text>
        </TouchableHighlight>
      </View>
    )
  }
})
And of course the styles—without them, the layout and fonts will be all skewed. The properties are self-explanatory for the most part, so we won’t go into detail on them.
var styles = StyleSheet.create({
  navigatorContainer: {
    flex: 1
  },
  container: {
    flex: 1,
    justifyContent: 'center',
    alignItems: 'center',
    backgroundColor: '#F5FCFF',
  },
  welcome: {
    fontSize: 20,
    textAlign: 'center',
    margin: 10,
  },
  instructions: {
    textAlign: 'center',
    color: '#333333',
    marginBottom: 5,
  },
  textInput: {
    borderColor: '#8E8E93',
    borderWidth: 0.5,
    backgroundColor: '#fff',
    height: 40,
    marginLeft: 60,
    marginRight: 60,
    padding: 8,
  },
  button: {
    color: '#111',
    marginBottom: 15,
    borderWidth: 1,
    borderColor: 'blue',
    padding: 10,
    borderRadius: 20,
    fontWeight: '600',
    marginTop: 30
  }
})
So, we invoke the push() method from the Search component when we press Search. This will trigger an event in the Navigator element:namely renderScene , which renders the forecast. Let’s implement it. I promise, we are almost done!
The forecast.ios.js file starts with importations. By now, if this is unfamiliar to you, I am powerless.
'use strict'

var React = require('react-native')
var {
  StyleSheet,
  Text,
  TextInput,
  View,
  ListView,
  ScrollView
} = React
I wrote this function, mostly for Americans, to calculate F from C . It’s probably not very precise, but it’ll do for now:
const fToC = (f) => {
  return Math.round((f - 31.996)*100/1.8)/100
}
The ForecastRow component is stateless (more on stateless components in chapter 10). Its sole purpose is to render a single forecast item:
const ForecastRow = (forecast)=> {
  return (
    <View style={styles.row}>
      <View style={styles.rightContainer}>
        <Text style={styles.subtitle}></Text>
        <Text style={styles.subtitle}>
In the row, we output the date (dt_txt ), description (rainy or sunny), and temperatures in C and F (figure 9-X). The latter is achieved by invoking the fToC function defined earlier in this file:
          {forecast.dt_txt}: {forecast.weather[0].description}, {forecast.main.temp}C/{fToC(forecast.main.temp)}F
        </Text>
       </View>
    </View>
  )
}
The result will look as shown in figure 9-X.
Next, we export the Forecast component, which is a ScrollView with Text and a ListView :
module.exports = React.createClass({
  render: function() {
    return (
      <ScrollView style={styles.scroll}>
        <Text style={styles.text}>{this.props.forecastRaw.city.name}</Text>
The ListView takes dataSource and renderRow properties to render the grid. The data source must be of a special type. It cannot be a plain JavaScript/Node array:
        <ListView dataSource={this.props.forecastData} renderRow={ForecastRow} style={styles.listView}/>
      </ScrollView>
    )
  }
})
And the styles. Tadaah!
var styles = StyleSheet.create({
  listView: {
    marginTop: 10,
  },
  row: {
    flex: 1,
    flexDirection: 'row',
    justifyContent: 'center',
    alignItems: 'center',
    backgroundColor: '#5AC8FA',
    paddingRight: 10,
    paddingLeft: 10,
    marginTop: 1
  },
  rightContainer: {
    flex: 1
  },
  scroll: {
    flex: 1,
    padding: 5
  },
  text: {
    marginTop: 80,
    fontSize: 40
  },
  subtitle: {
    fontSize: 16,
    fontWeight: 'normal',
    color: '#fff'
  }
})
The last final touch is if you’re working offline and using a local URL. There are two files you need to have:
- response.json—Response to the real API call for London
- weather-api.js—Ultra-minimalistic Node web server that takes response.json and serves it to a client
Go ahead and copy response.json from GitHub. Then implement this Node.js server using only the core modules (I love Express or Swagger, but using them here is an overkill):
var http = require('http'),
  forecastData = require('./response.json')

http.createServer(function(request, response){
  response.end(JSON.stringify(forecastData))
}).listen(3000)
Start the server with $ node weather-api , bundle the React Native code with $ react-native start , and reload the Simulator. The bundler and the server must be running together, so you might need to open a new tab or a window in your terminal app/iTerm.
Note:if you get an “Invariant Violation:Callback with id 1–5” error, make sure you don’t have the Chrome debugger opened more than once.
You should see an empty city name field. That’s okay, because this is the first time you’ve launched the app. I intentionally left the logs in the storage implementation. You should see the following when you open DevTools in the Chrome tab for debugging React Native (it typically opens automatically once you enable it by going to Hardware->Shake Gestures->Debug in Chrome—not that you are going to shake your laptop!):
AsyncStorage GET for cityName: "null"
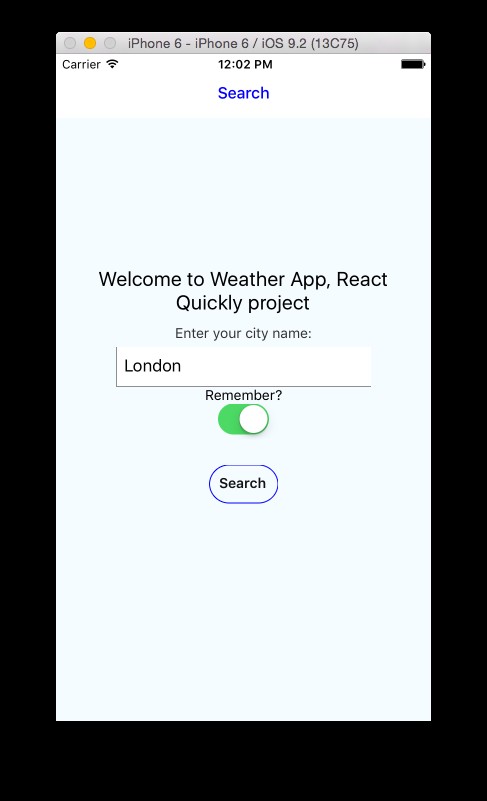
Play with the toggle, enter a name (Figure 13), and get the weather report. The app is done. Boom! Now put some nice UI on it and ship it!
Quiz
- How do you create a new React Native project:create files manually, or run
$ npm init,$ react-native init, or$ react native init? - What type of data does a
ListViewtake:array, object, or data source? (Data source) - One of the benefits of React Native vs. native development is that React Native has the live reload ability. ¿Verdadero o falso? (True)
- You can use any CSS in the styles of the React Native
StyleSheetobjeto. ¿Verdadero o falso? (False) - Which Objective C file can you switch the React Native bundle location in:bundle.cc, AppDelegate.m, AppDelegate.h, package.json, or index.ios.js? (AppDelegate.m)
Actions
Learning just by reading is not as effective as learning by reading and then doing. Sí. Even a good book like this. So take action NOW to solidify the knowledge.
- Watch React Native Quickly screencasts at Node.Unversity which will walk you through the Weather app
- Run Weather and Timer on your computer from the source code
- Change text such as button labels or menu names, see results in the Simulator
- Change a sound file in Timer
- Add geolocation to Weather (see Geolocation)
Resumen
This was a been a quick book, but we covered not not just one but two projects. In addition to that, we’ve also covered:
- How React Native is glued to the Objective C code in Xcode projects
- Main components, such as
View,Text,TextInput,Touchables, andScrollView - Implementing an app with
Navigator - How to persist the data locally on the device
- Using the
fetchAPI to communicate with an external HTTP REST API server (you can use the same method to persist the data on the external server, or do a login or logout)
React Native is an amazing piece of technology. I was really surprised, in a positive way, once I started learning and using it. There’s a lot of evidence that React Native may become the next de facto way of developing mobile apps. The live reload feature can enable developers to push code to their apps without resubmitting them to the App Store—cool, right?
Quiz Answers
$ react-native initbecause manual file creation is tedious and prone to errors- Data source
- True
- False
- AppDelegate.m